Aluminum Fence Installation in Florida: Steps and Costs

The most popular advice for aluminum fence installation starts with picking a panel style. That order is backwards in Florida. A handsome picket design won't fix a post set into an easement, a gate that drags across pavers, or a pool run that measures short at a low spot in the yard.
Panels matter, but the jobs that pass inspection and stay straight begin with a survey, confirmed finished grade, utility locates, and a footing detail matched to the site. The fence is the visible result. The sequence underneath it decides whether the result lasts.
Table of Contents
- Installation Sequence From Survey to Final Inspection
- Site Prep, Utility Locates and Permits
- How to Set Posts and Footings
- Florida Pool Barrier Rules Inspectors Check
- How to Attach Panels and Hang Gates
- Wind and Corrosion Specs for Florida Sites
- Confirm Permits and Pricing Before You Order Panels
Installation Sequence From Survey to Final Inspection
The order of work matters more than the panel choice. Posts can cross a property line, hit buried utilities, or leave a pool barrier with a gap at a low point if the crew lays out the job before confirming the site conditions. Gate swing adds another check: slope, hinge placement, and latch position must work together.
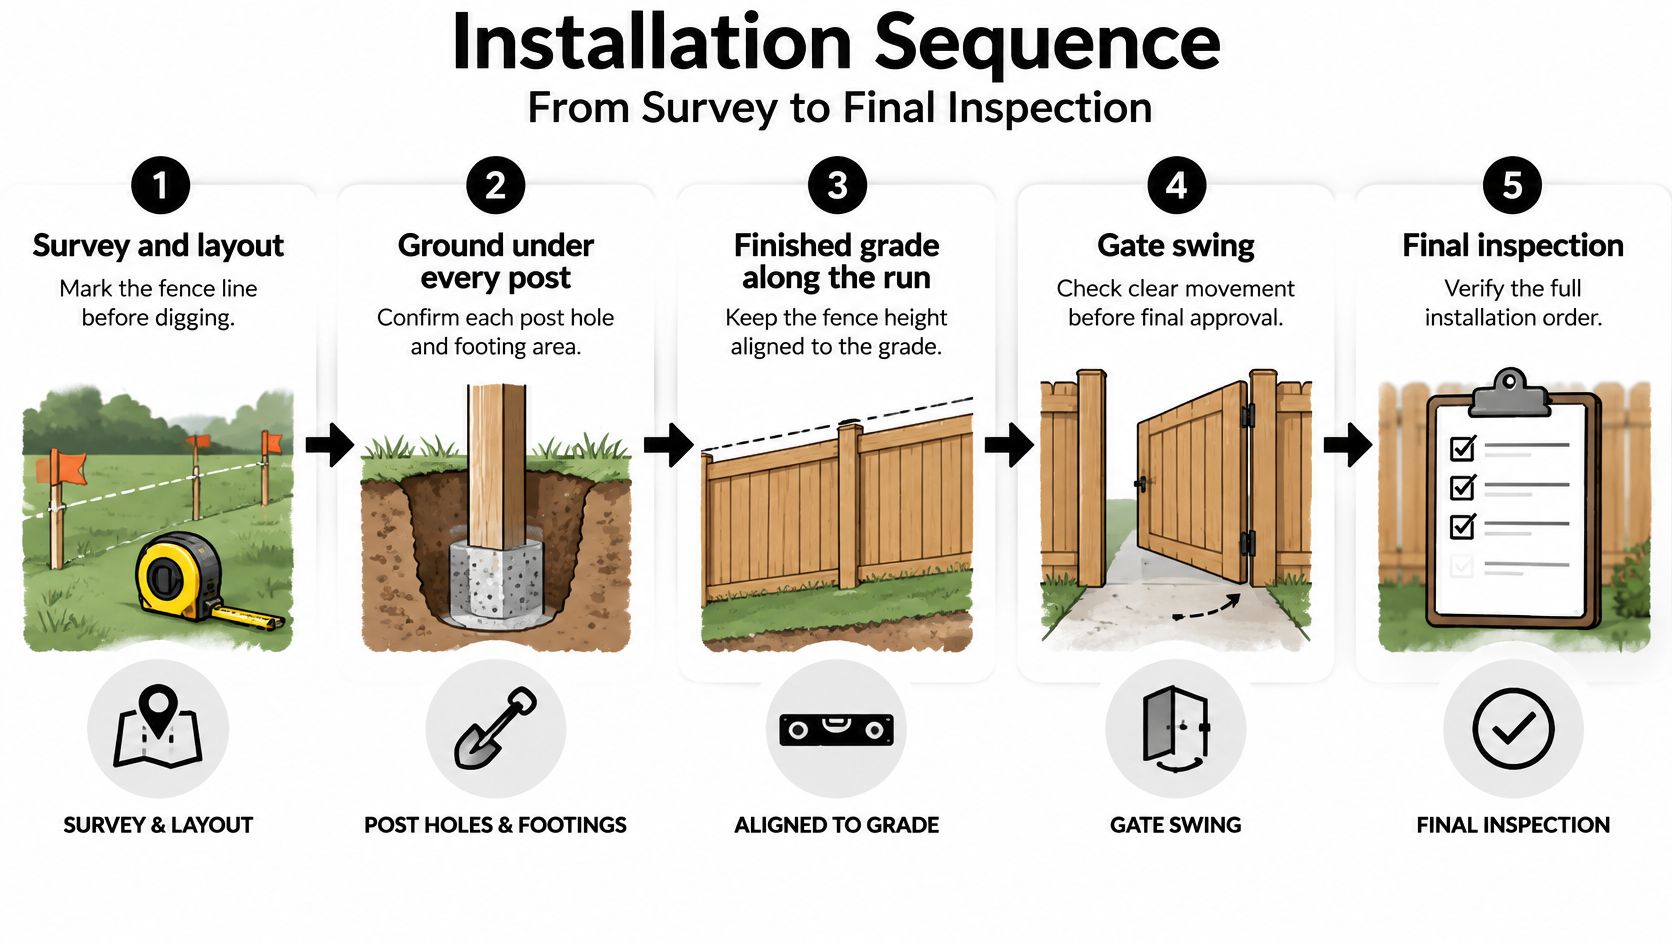
The sequence that prevents rework
- Confirm the survey. Check lot lines, easements, setbacks, HOA requirements, and the proposed gate swing before placing layout stakes.
- Submit permits. Prepare the required permit documents and Notice of Commencement before installation begins.
- Request utility locates. Contact Sunshine 811 within the required window before excavation. Do not wait until digging day.
- Stake the posts. Mark terminal, corner, and gate-post locations against the survey, then lay out the intermediate posts along the fence line.
- Dig footings. Check each hole against the approved dimensions, using a tape to confirm depth.
- Set and brace posts. Place and consolidate the concrete, then brace posts against movement while it cures.
- Check spacing and grade. Confirm post spacing and planned grade transitions before fitting panels.
- Attach panels and hang gates. Fit the panels, then set and test the hinges, closer, and latch from both sides.
- Record measurements and arrange inspection. Check fence height, bottom gaps, and gate clearances before the inspection.
Keep the sequence intact. Staking before checking the survey can put the fence over a boundary; digging before utility locates risks damaging buried lines. Underground Infrastructure's report on 2025 utility damage found that failure to contact 811 remained the leading cause of damage, and the top ten root causes accounted for 86% of reported damages.
Print this: Survey checked. Permit and Notice of Commencement filed. Locate ticket in hand. Posts staked. Footings measured. Posts braced and cured. Panels fitted. Gate tested. Measurements recorded.
Site Prep, Utility Locates and Permits
Before any hole gets dug, three documents belong in the project file. The first is a current survey showing lot lines and easements. The second is HOA architectural approval where the community requires it. The third is the municipal fence detail covering height, setback, and footing requirements for the address.
Homeowners who skip the survey often discover the problem after concrete cures, when a neighbor, an inspector, or a resale survey flags a post over the line. Pulling one post out of cured concrete costs more than the whole pre-dig paperwork combined.
Walking the site before layout
A proper site walk starts with stakes and a string line at the planned fence line. From that line, the installer notes slopes, drainage swales, irrigation heads, septic fields, existing fences, trees, and any structure that could interfere with a gate swing. A tape measure, a 4-foot level, and marking paint handle most of the walk.
Slope deserves extra attention on Florida lots. A run that looks flat can drop enough over 40 feet to change the bottom gap at the low end. Notes taken at the walk become the grade record used later when panels rack or step down a slope.
Locate timing is a hard rule
Florida excavation planning requires contacting Sunshine 811 at least 2 business days but no more than 5 business days before digging, according to the City of Tallahassee digging guidance. Every terminal, corner, gate, and intermediate post counts as a separate ground penetration, so a single fence line can mean dozens of holes near buried electric, gas, water, and telecom lines.
That window turns locating into a scheduling step, not a formality. A permit issued on Monday doesn't authorize digging on Tuesday if the locate ticket isn't clear. Crews should preserve the utility marks, respect tolerance zones, and shift a post rather than dig beside a marked line.
Public locates have one gap homeowners miss. Privately owned lines, such as irrigation laterals, outdoor lighting, pool plumbing, and yard drains, may not get marked. Owners should hand over any as-built drawings, septic records, or irrigation plans. Where a post must land near a suspected private line, hand digging with a narrow shovel exposes it without the damage an auger causes.
The pre-dig photo record
Permits and the Notice of Commencement protect the owner on paper. Photos protect everyone on the ground. The fence permit requirements overview for Florida projects covers the filing steps, and the photo record should match that paperwork.
- Stakes and string line: Shows the agreed layout before digging changes anything.
- Utility marks: Proves marks were present and visible at each post location.
- Grade at each post: Records low spots that affect height and bottom gap later.
- Existing conditions: Captures cracked pavers, leaning fences, or damaged turf that predate the job.
If it isn't photographed before the auger starts, it becomes an argument after the concrete sets.
How to Set Posts and Footings
Footing size and post embedment come from the approved municipal or engineering detail, not from a rule of thumb. Wind exposure, fence height, soil type, surcharge, and gate width all change the answer. A detail that works for a short inland run can be undersized for a taller coastal fence, which is why guessing at depth is the fastest way to fail an inspection or lose a fence in a storm.
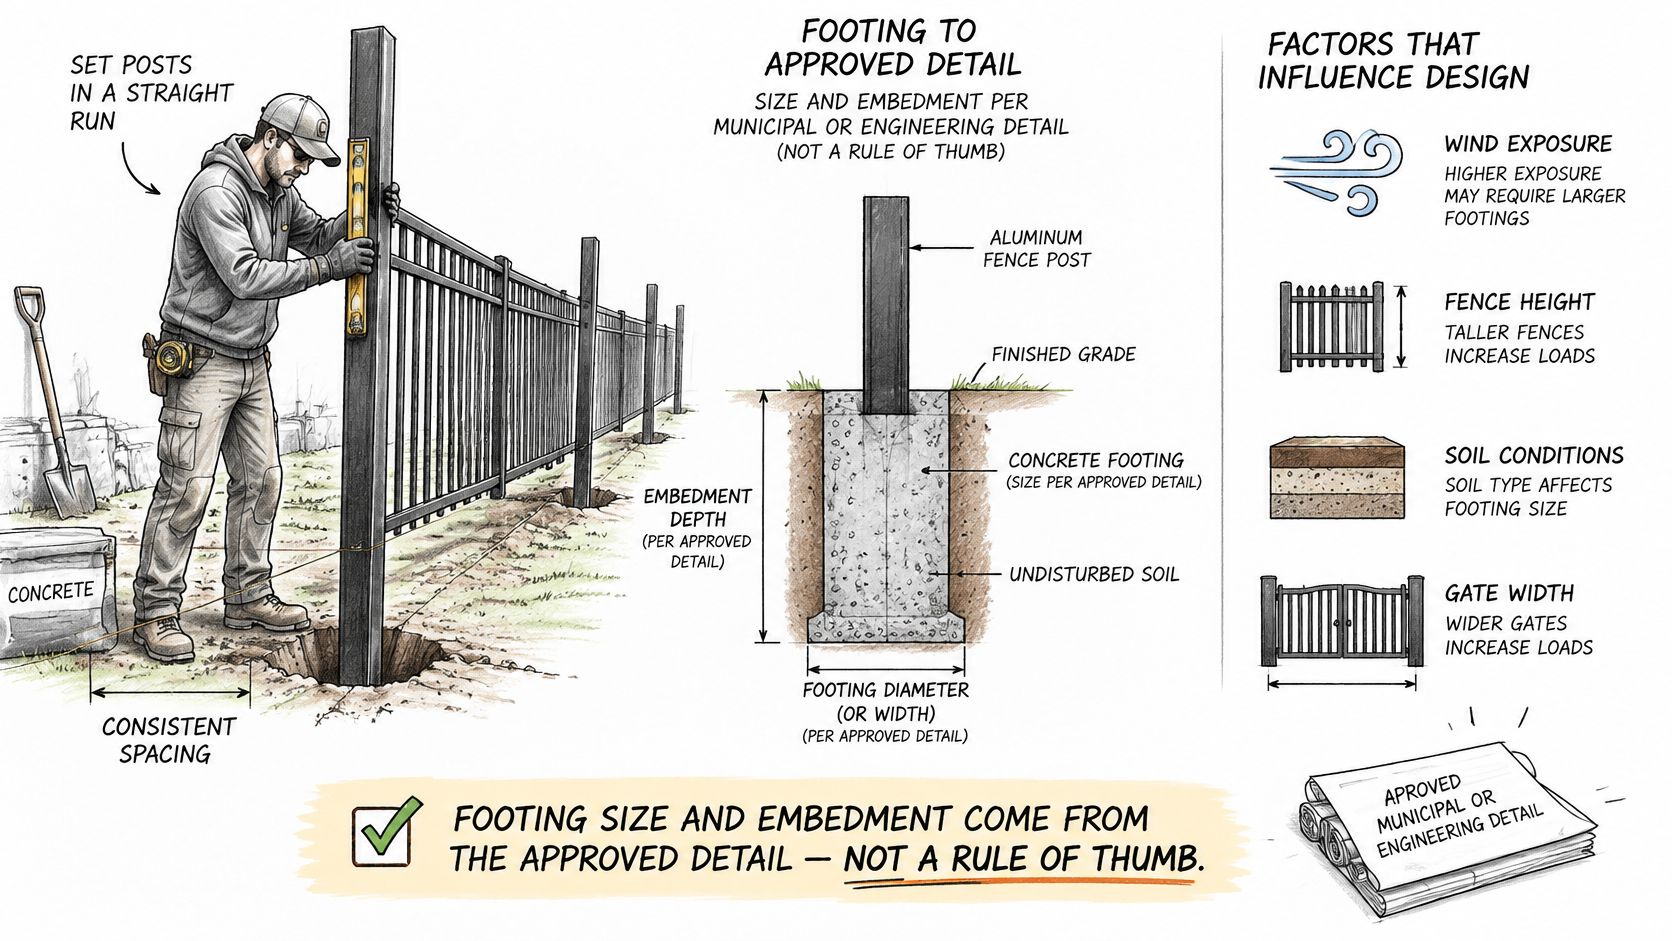
Setting posts in the right order
- Set terminal, corner, and gate posts first. These posts carry the most load and fix the line that every intermediate post follows. A corner post that's off by half an inch pushes the error down the entire run.
- Dig to the approved diameter and depth. Hole depth gets checked with a tape before each post goes in, not estimated from the auger. Loose spoil at the bottom gets removed so the footing bears on firm ground.
- Check plumb in two directions. A post can look straight from the street and lean along the fence line. A level on two faces catches both errors while the hole is still open.
- Brace against rotation. Temporary bracing with stakes and scrap lumber holds the post while concrete is placed. Aluminum posts are light, which makes them easy to handle and easy to knock out of line.
- Place and consolidate the concrete. Concrete goes around the post in lifts, rodded or tamped to remove voids. An air pocket beside a gate post becomes movement the first season the gate gets heavy use.
- Recheck after cure. Once the mix cures, line, height, and post tops get verified against the planned rail line. Corrections are cheap before panels arrive and expensive after.
The Associated General Contractors 811 process survey found that 53% of respondents identified unmarked or mismarked utilities as the most frequent cause of excavation damage and near misses, while 78% cited weaknesses in the locating process. Those numbers explain why post locations get verified against the locate ticket at the hole, not assumed from the layout sketch.
The failures that cost the most
Posts set before finished grade is confirmed sit at the top of the list. If landscaping, pavers, or fill change the grade after posts go in, rail heights and bottom gaps change with it. Concrete poured around a misaligned post locks the mistake in place. Gate posts placed without allowance for slope or drainage at the base leave the leaf dragging or the footing sitting in standing water.
Soil matters more than most estimates admit. Loose sand loses grip around a footing. Soft or organic soil may need a wider or deeper footing, or removal and replacement with compacted fill. The guide to choosing and setting an aluminum fence post explains post options, but the permit detail for the wind zone governs what goes in the ground.
A simple quality record closes the loop. It should list footing dimensions, plumb checks, concrete placement notes, and final post heights, tied to the pre-dig photos and locate ticket from site prep. When an inspector, HOA, or buyer asks questions a year later, that record answers them.
Florida Pool Barrier Rules Inspectors Check
A fence standing beside a pool isn't automatically a pool barrier. Florida law treats the barrier as a safety system, and the panel style is only one part of it. Under Florida's Residential Swimming Pool Safety Act, the barrier must be at least 4 feet high measured on the outside, with no gaps, openings, or structural features that let a young child crawl under, squeeze through, or climb over it.
Pool barrier requirements to measure during installation
| Element | Requirement | Common failure |
|---|---|---|
| Barrier height | At least 4 ft, measured on the outside | Grade drop along the run lowers the effective height |
| Bottom gap | No gap a young child can crawl under; 2 in maximum on the side facing away from the pool | Low spots, retaining walls and settled ground |
| Openings | No opening that passes a 4-inch sphere | Picket spacing or gaps beside the gate |
| Gate swing | Opens outward, away from the pool | Hinges mounted on the wrong side |
| Closing and latching | Self-closing and self-latching | Gate drifts open, or the latch relies on spring tension alone |
| Release height | At least 54 in above gate bottom, reachable only from the correct side | Latch reachable through a nearby opening |
| Opening near release | No more than 1/2 in within 18 in of the release | Gap beside the latch from poor fitting |
The statute also requires the release to sit on the pool side, positioned so a young child can't reach it over the top or through an opening. A taller fence doesn't cure a badly placed latch. Geometry matters as much as height.
Why passing numbers still fail in the yard
Inspectors measure at the least favorable spot, not the average. A run that measures fine at the house can fail where the grade drops near a swale. Bottom gaps get checked at low spots and beside gates, where settled soil and drainage changes open clearance that wasn't there at layout.
Climbable objects cause the quiet failures. Patio furniture, planters, grills, pool equipment, and retaining walls placed against the fence give a child footholds the panel itself doesn't have. Horizontal rails positioned where small feet can use them create the same problem. Layout decisions made by the homeowner after installation can undo a compliant enclosure, so the area beside the fence needs the same attention as the fence itself.
An existing yard fence can serve as part of the barrier only when it sits on the pool perimeter and meets the statute on its own. A decorative boundary that leaves a route from a side yard, a door, or a neighboring lot into the pool area doesn't qualify, regardless of its height.
- Gate swing: Opens away from the pool through its full travel.
- Latch height and reach: Release can't be reached over the top or through the pickets.
- Openings: Checked at pickets, gate edges, and wall junctions.
- Bottom gap: Measured at every low point along the run.
- Climbable objects: Nothing beside the fence works as a step.
How to Attach Panels and Hang Gates
Panel work starts with a check, not a drill. Post spacing and grade transitions get verified along the full run before any rail goes on. Aluminum panels are rigid, so a panel forced across a dip or a spacing error binds, twists, and telegraphs the mistake into every fastener. Dry-fitting the first panel between two posts confirms the layout while corrections are still free.
Attaching panels without forcing them
- Set the bottom rail height on each run. Rail height follows the finished grade plan, then gets checked with a level. On sloped ground, racked panels follow the grade while stepped panels level each section, and the choice changes where the bottom gap lands.
- Fit pickets or panels into the rails. Supplied brackets and fasteners get tightened snug, never over-torqued. Thin aluminum members strip and distort under an impact driver run at full setting, so a clutch-set drill or hand tightening protects the connection.
- Check each panel for twist. Sight down the run and check diagonals before moving on. A twisted panel racks the next one, and the error compounds post by post.
- Confirm spacing at every opening. Gate openings, wall junctions, and corners get measured for picket gaps. These junctions, not the middle of a panel, are where oversized openings hide.
Welded panels reduce one source of error. AlliedFenceAndGate.com™ fabricates welded aluminum panels with every picket fusion-welded to the rails, producing a one-piece panel with no visible fasteners. Assembled systems depend on each screw being placed and tightened correctly in the field, which makes the twist check more important, not less.
Hanging the gate
Gate work starts with swing direction, because hinge side can't change after hardware is fixed. The leaf must clear concrete, pavers, pool decking, and slope through its full travel. A gate that swings freely over bare soil can drag once pavers are laid beneath it, so finished surfaces get confirmed before hinges are mounted.
Hinges get rated for the weight of the leaf. Undersized hinges are the direct cause of sagging gates, and a sagging gate stops latching long before it stops swinging. The latch gets set at the required height with the correct gap, then tested from both sides. For pool access, the closer gets adjusted until the gate closes and latches from several opening angles, including barely open, because a closer set too loose lets wind hold the leaf off the latch.
A gate isn't finished when it hangs straight. It's finished when it closes, latches, and stays latched from every angle a person actually leaves it.
Final checks cover fastener tightness, rail alignment, post caps, and a wipe-down of the powder coat. Scratches at cut points get touch-up paint the same day, while the crew and materials are still on site.
Wind and Corrosion Specs for Florida Sites
Aluminum doesn't rust, but the hardware holding it together can. Steel fasteners and mixed metals are where corrosion starts on a Florida fence, and salt air, irrigation overspray, and pool chemicals accelerate the damage. Specifying the hardware in writing matters as much as specifying the panel.
Florida site exposure and the specs to request
| Site exposure | Main concern | Spec to request | Verify before pouring |
|---|---|---|---|
| Inland residential lot | Irrigation overspray and humidity | Aluminum posts with stainless or hot-dip galvanized hardware | Irrigation lines and wind zone for the address |
| Within a few miles of the coast | Salt spray on fasteners and finishes | Marine-grade stainless fasteners and powder-coated finish | Footing depth and post embedment from the building department |
| Pool deck or seawall edge | Salt spray plus splash and pool chemicals | Stainless hardware and sealed post bases | Clearance from deck, seawall and pool barrier geometry |
| Hurricane-prone zone | Wind uplift and panel loading | Footing size and embedment per the permit detail or engineering letter | Engineered detail filed with the permit |
Wind drives the footing specification. Depth and embedment follow the local wind requirement and the permit detail, and the engineering letter or building department detail belongs in the permit file before digging starts. Homeowners should ask for that document by name, because a verbal promise about depth can't be inspected later.
Finish care starts at installation. Powder coat gets checked for scratches at every cut and welded point, and touch-up paint costs a fraction of a replacement rail. Drainage matters too. Standing water at a post base shortens hardware life even on aluminum, so the footing top should sit slightly above grade where the design allows, shedding water away from the post.
Three items belong in writing on every Florida quote: the hardware material, the post type and size, and the footing detail for the wind zone. Quotes that list only linear feet and panel style leave the durability decisions unmade.
Confirm Permits and Pricing Before You Order Panels
A panel price cannot settle a fence budget until the permit path, site conditions, and gate requirements are clear. Fixr's 2025 aluminum fence cost guide estimates a professionally installed 100-foot aluminum fence at approximately $3,000 to $8,500 nationally, with an average of about $7,150.
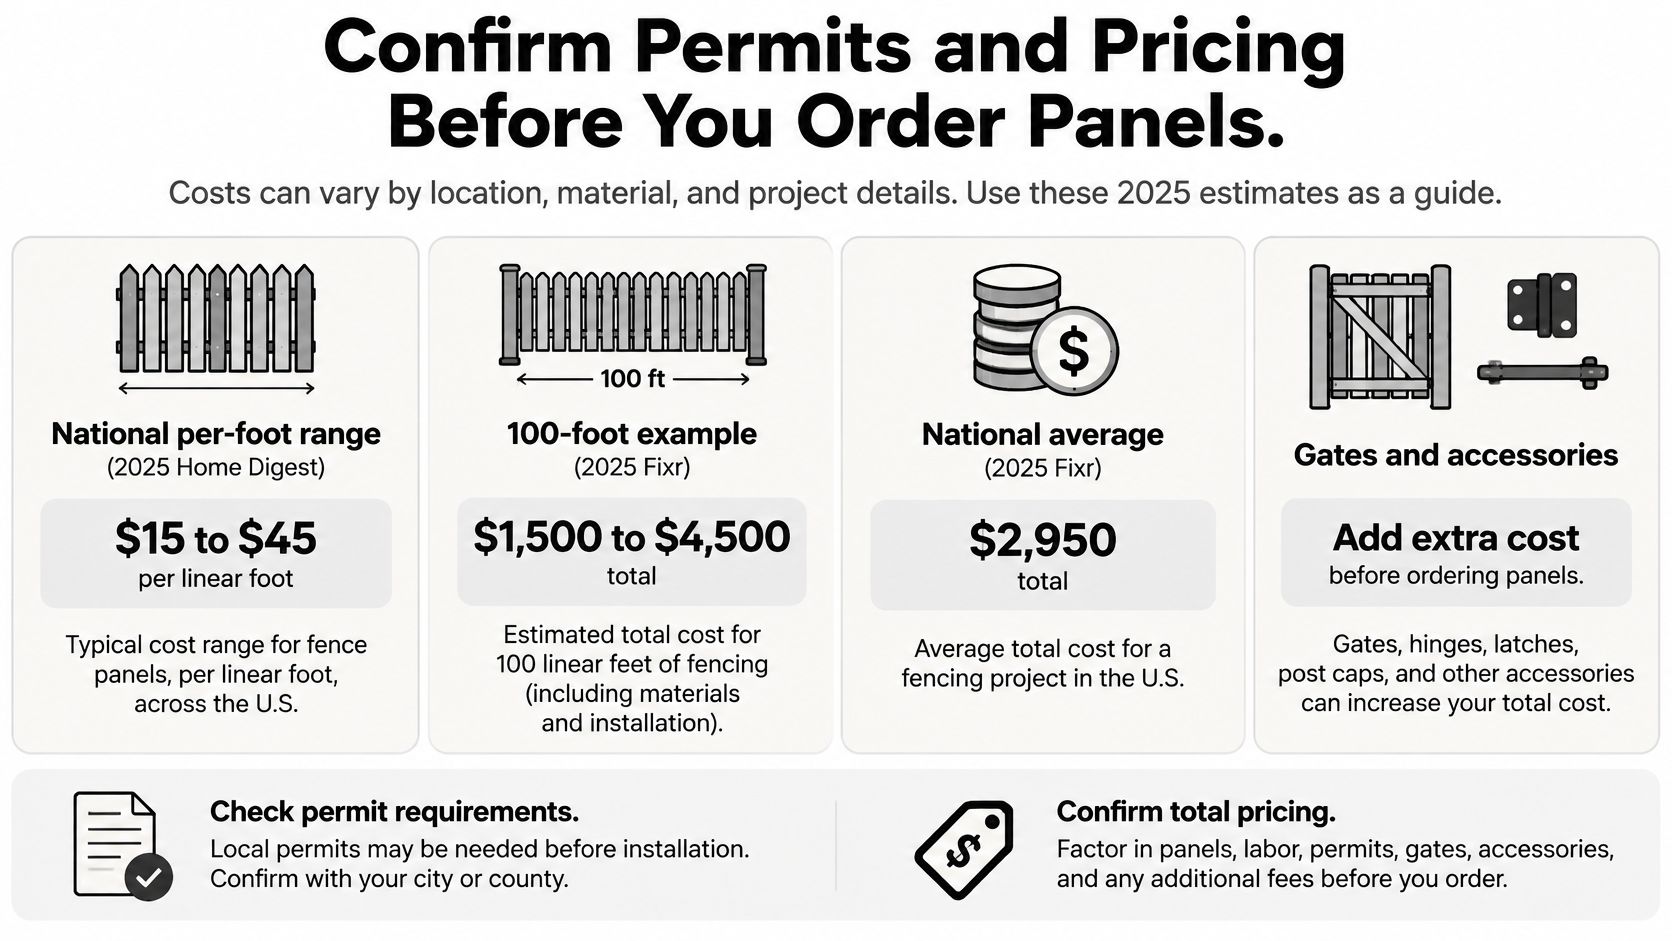
Aluminum fence installed price ranges
| Fence type | Installed price | Notes |
|---|---|---|
| 100 ft aluminum run | About $3,000 to $8,500 | Fixr national estimate; average about $7,150 |
| Standard aluminum picket | $28 to $50 per linear foot | Installed range from AlliedFenceAndGate.com™ |
| Custom welded aluminum | $50 to $70+ per linear foot | Installed range from AlliedFenceAndGate.com™ |
| Gates and operators | Priced separately from the run | Request separate line items |
All listed fence prices from AlliedFenceAndGate.com™ include professional installation, concrete-set posts, and standard hardware. Gates, operators, and specialty items are priced separately. The aluminum fence price-per-foot breakdown explains the cost factors behind the estimate. Compare quotes line by line: a low per-foot figure may not include gates or specialty items.
Before ordering panels, confirm the permit path, Sunshine 811 locate date, HOA approval, and any pool-barrier measurements that apply. Check that the quote accounts for the site and the required work, rather than relying on a panel price alone. Free estimates are available for all fence types, so ask which items are included and which are priced separately.
#MartinCountyFencing #PalmBeachCountyFencing #TreasureCoastFencing #StuartFencing #JupiterFencing #PalmBeachGardensFencing #PortStLucieFencing #HobeSoundFencing #AluminumFence #AluminumFencing #PoolFenceFlorida #FloridaFenceInstaller #FenceInstallation #PoolSafetyFence #WeldedAluminumFence
AlliedFenceAndGate.com™ installs aluminum fencing across Florida's Treasure Coast and northern Palm Beach County. Homeowners can request a free estimate at AlliedFenceAndGate.com™.
Related Fencing Services
Need a fence or gate on the Treasure Coast?
Licensed, insured, and bonded. Free estimates across Martin, St. Lucie, Indian River & Palm Beach counties.
Call (772) 530-3127