Chain Link Fence Post Sizing and Spacing for Florida
The fence quote lists different posts, extra braces at the corners, and larger footings beside the gate. A homeowner comparing that quote with a stack of similar-looking pipe at the supply yard could reasonably wonder what makes the extra material necessary.
In Florida, a chain link fence post is part of a load-carrying system, not just something that holds mesh upright. Fence height, fabric openings, wind exposure, soil, gate weight, and changes in direction all affect the post plan. A cheaper layout can look straight on installation day and still leave the property owner with leaning corners or a dragging gate after severe weather.
Table of Contents
- Chain Link Fence Post Types and Where Each One Goes
- Post Spacing and Hole Depth for Each Fence Height
- How to Set a Chain Link Fence Post in Concrete
- Galvanized or Coated Posts for Florida Conditions
- Wind Zones and Pool Barriers Change the Post Plan
- Common Post Failures and How to Prevent Them
- Choose the Right Post Plan for Your Property
Chain Link Fence Post Types and Where Each One Goes
A homeowner counting posts on a quote may notice that only some have braces. That's intentional when the layout is properly specified: intermediate posts support the fabric, while the posts that stop, redirect, or interrupt a run also resist its pulling force.
Terminal post is a category that includes end, corner, and gate posts. The names describe their jobs, so a corner post may also appear as a terminal post on a material schedule. Counting those labels as separate components can inflate an estimate.
The Texas Department of Transportation chain-link fence specification limits line-post spacing to 10 feet, requires bracing at terminal locations, and places pull posts at direction changes greater than 20 degrees and intervals no greater than 500 feet.
Chain link fence post types, location and load
| Post type | Where it sits | Main load it carries | Bracing needed |
|---|---|---|---|
| Line post | Straight runs between ends and corners, up to 10 ft apart | Wind pushing on the mesh | No, set plumb in concrete |
| Terminal post | Fence ends and both sides of gates | Fabric tension plus wind | Yes, top brace |
| Corner post | Where adjoining fence runs change direction | Tension from two runs at once | Yes, brace in both directions |
| Pull post | Direction change over 20 degrees, or every 500 ft on long runs | Fabric tension along the run | Yes, brace or truss rod |
| Gate post | Both sides of each gate | Gate weight and swing | Yes, with truss rod |
| T-post | Light residential or temporary lines | Limited, not framework | Not suitable for commercial or wind-exposed framework |
Match the post to its job
Line posts keep straight runs aligned and support fabric between anchored ends. They aren't substitutes for terminal posts, even when both pieces of pipe accept the same fitting.
Corner posts need particular attention because stretched fabric pulls from adjoining directions. Leaving out a brace can allow the corner to rotate inward, which loosens both runs rather than just the section beside the post.
Gate posts have another job: keeping the opening square while the gate hangs and moves. A heavier gate or an operator changes the demands on the supporting post and foundation. Selecting gate posts by fabric height alone misses that load.
Ordering rule: Count ends, corners, gate openings, and direction changes before counting intermediate posts.
Lightweight T-posts may be useful for temporary boundaries, but they don't provide the engineered framework needed for a permanent commercial or wind-exposed chain-link installation. Substituting them saves material at the expense of suitable connections, stiffness, and anchorage.
Post Spacing and Hole Depth for Each Fence Height
Minimum hole depth and maximum spacing by fence height
| Fence height | Minimum hole depth | Max line-post spacing |
|---|---|---|
| 4 ft | 24 in | 10 ft |
| 6 ft | 30 in | 10 ft |
| 8 ft | 36 in | 10 ft |
| 10 ft | 42 in | 10 ft |
| 12 ft | 48 in | 10 ft |
The spacing column follows the 10-foot maximum in ASTM F1043, which covers industrial chain-link framework reaching 12 feet in height and ties allowable arrangements to mesh, wire gauge, and wind loads. The depth column applies the height-based installation baseline associated with ASTM F567 installation guidance: 24 inches minimum, plus 3 inches for every foot above 4 feet.
These figures are starting minimums, not a complete Florida foundation design. Soil support, exposure, frost where relevant, and local requirements can call for a different foundation. A contractor shouldn't treat a lookup table as permission to ignore the property's conditions.
Maximum spacing isn't the preferred spacing everywhere
Wider spacing reduces the number of holes, posts, and fittings. It also leaves each post responsible for a longer stretch of fabric. That trade-off becomes important when wind exposure or the selected fabric increases the load.
The framework specification matters as much as the visible pipe diameter. Wall strength, coating, mesh configuration, and the connections between components belong in the same selection process. A large-looking post with an unsuitable wall or fitting arrangement isn't automatically a stronger installation.
For a hypothetical 100-foot straight run laid out at the cited maximum spacing, the arithmetic gives 10 spaces and 11 post locations. Divide the run length by the selected spacing, round the number of spaces up, and add the starting location.
Those are framework locations, not automatically a shopping list of line posts. The end positions need terminal posts, and a gate or corner changes the layout. Terminal, gate, and braced assemblies must then be accounted for without double-counting shared locations.
A maximum span is a ceiling. It isn't a reason to stretch every bay to that distance.
Keep excavation depth separate from post embedment
Hole depth and post embedment aren't interchangeable. A foundation may extend below the bottom of the steel, so the quote needs to identify both dimensions.
For fences taller than the chart, the height-based increment can help with preliminary planning, but it shouldn't be extrapolated indefinitely. Loose soil, unusual height, and difficult excavation warrant confirmation of the foundation detail before concrete is ordered. The inspector or project engineer should resolve that detail before pouring, not after a footing fails inspection.
How to Set a Chain Link Fence Post in Concrete
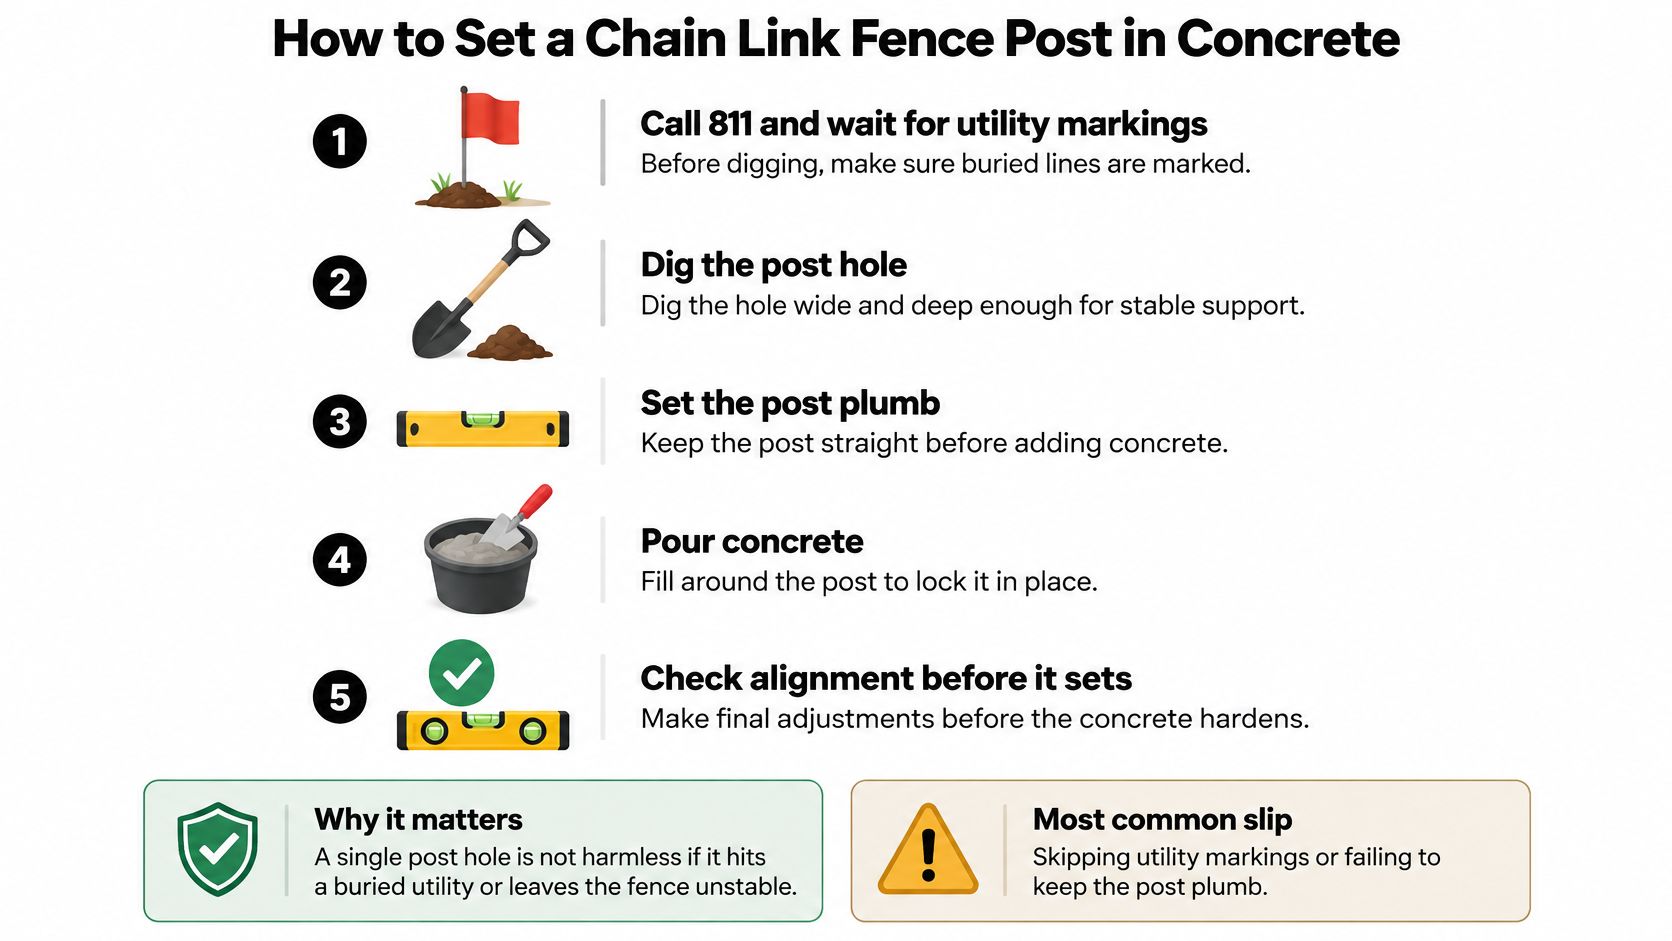
A good installation starts before the auger reaches the ground. The crew needs an approved line, identified utilities, compatible framework, and a footing detail that matches the property.
Establish the line and excavate safely
Request utility locating before digging. The Kansas Corporation Commission's excavation-safety notice reinforces the need to call 811 before excavation, including fence work. The crew must wait for the applicable response period, preserve markings, and arrange separate identification of private irrigation, pool wiring, or other owner-installed lines where necessary.
Set string lines and mark post centers. Establish terminal positions from the approved layout, then distribute intermediate posts along each run. The common slip is measuring from an existing fence without confirming that it follows the intended boundary.
Dig to the specified depth and diameter. ASTM F567 footing guidance describes typical footing diameters of approximately four times the post cross-section for posts up to 4 inches outside diameter, and three times for larger posts. Stopping shallow at a root or rock isn't an acceptable substitute for a revised foundation detail.
Align, concrete, and allow the footing to develop strength
Set the post plumb. A post level or spirit level should check adjoining faces while the string establishes the run alignment. A post can look straight from the street while leaning along the fence line.
Place concrete without leaving voids against the steel. Mix and place the selected concrete according to its product directions, working it around the post rather than leaving pockets beneath loose material. Crown the finished surface away from the steel so water doesn't collect at the joint.
Support the post while the concrete cures. Temporary braces keep terminal, corner, pull, and gate posts aligned while their footings develop strength. Permanent brace rails and truss rods serve a different purpose and still need installation.
Attach and tension fabric only after the footings are ready for loading. Follow the concrete manufacturer's curing requirements and the project specification rather than judging readiness by the surface appearance. Early stretching can rotate an apparently firm post inside its foundation.
The chain-link fence installation guide provides the broader sequence for coordinating framework, fabric, and gate installation. That coordination matters because a footing can be correctly poured yet disturbed by the next operation.
A finished footing should shed water, and the post shouldn't rock under ordinary hand pressure after curing. That's a useful workmanship check, not a substitute for a structural inspection or proof that the fence meets its design wind load.
Galvanized or Coated Posts for Florida Conditions
Post finishes compared for Florida conditions
| Finish | How it protects | Coastal Florida fit | Weak point to check |
|---|---|---|---|
| Hot-dip galvanized steel | Zinc layer corrodes first and shields the steel | Good for most sites | Cut ends, drilled holes, and welds need touch-up |
| PVC-coated over galvanized | Plastic layer over the zinc coating | Good where color and salt-spray protection matter | Chipped coating exposes the underlying protective layers |
| Aluminum post and rail | Oxide film resists corrosion | Strong choice close to salt water | Softer metal; mounts and fasteners must be compatible |
| Stainless or hot-dip galvanized hardware | Resists rust at ties, clamps, and fasteners | Recommended in salt air | Avoid incompatible metals in direct contact |
Galvanizing is the principal corrosion barrier on galvanized chain-link steel. Zinc protects the steel beneath it, but coating condition and thickness matter. A colored exterior finish doesn't eliminate the need to specify the substrate and inspect damage.
Inspect the places the finish gets disturbed
Cut ends, drilled holes, and field welds need compatible coating repair. A clean-looking installation can still have exposed steel inside a freshly drilled connection or beneath a fitting.
PVC-coated components offer an additional barrier, but torn plastic isn't harmless. Moisture can reach the zinc beneath it, and deterioration may remain difficult to see until the coating lifts. Repairs should address the exposed metal, not just hide it beneath mismatched paint.
Aluminum avoids red rust, but it isn't a direct structural replacement for every steel post. The framework and mounting hardware must be selected for the material, and incompatible metal contact should be isolated.
Finish selection doesn't replace foundation design
The Corpus Christi municipal chain-link specification illustrates a more demanding footing detail: for 6- to 12-foot fabric, it specifies 9-inch-diameter line-post holes, 38 inches deep, and 12-inch-diameter terminal holes, 38 inches deep, with 36 inches of post embedment.
That municipal detail isn't automatically Florida law. Where adopted as a project requirement, the stricter applicable depth controls: its excavation requirement exceeds the height-rule baseline for the shorter fence, while the height-based baseline becomes deeper for the taller fences.
Near salt water, the practical choice is a complete corrosion-resistant assembly, not merely an attractive post finish. The written schedule should identify coatings on posts and rails, compatible hardware, and the method for repairing installation damage.
Wind Zones and Pool Barriers Change the Post Plan
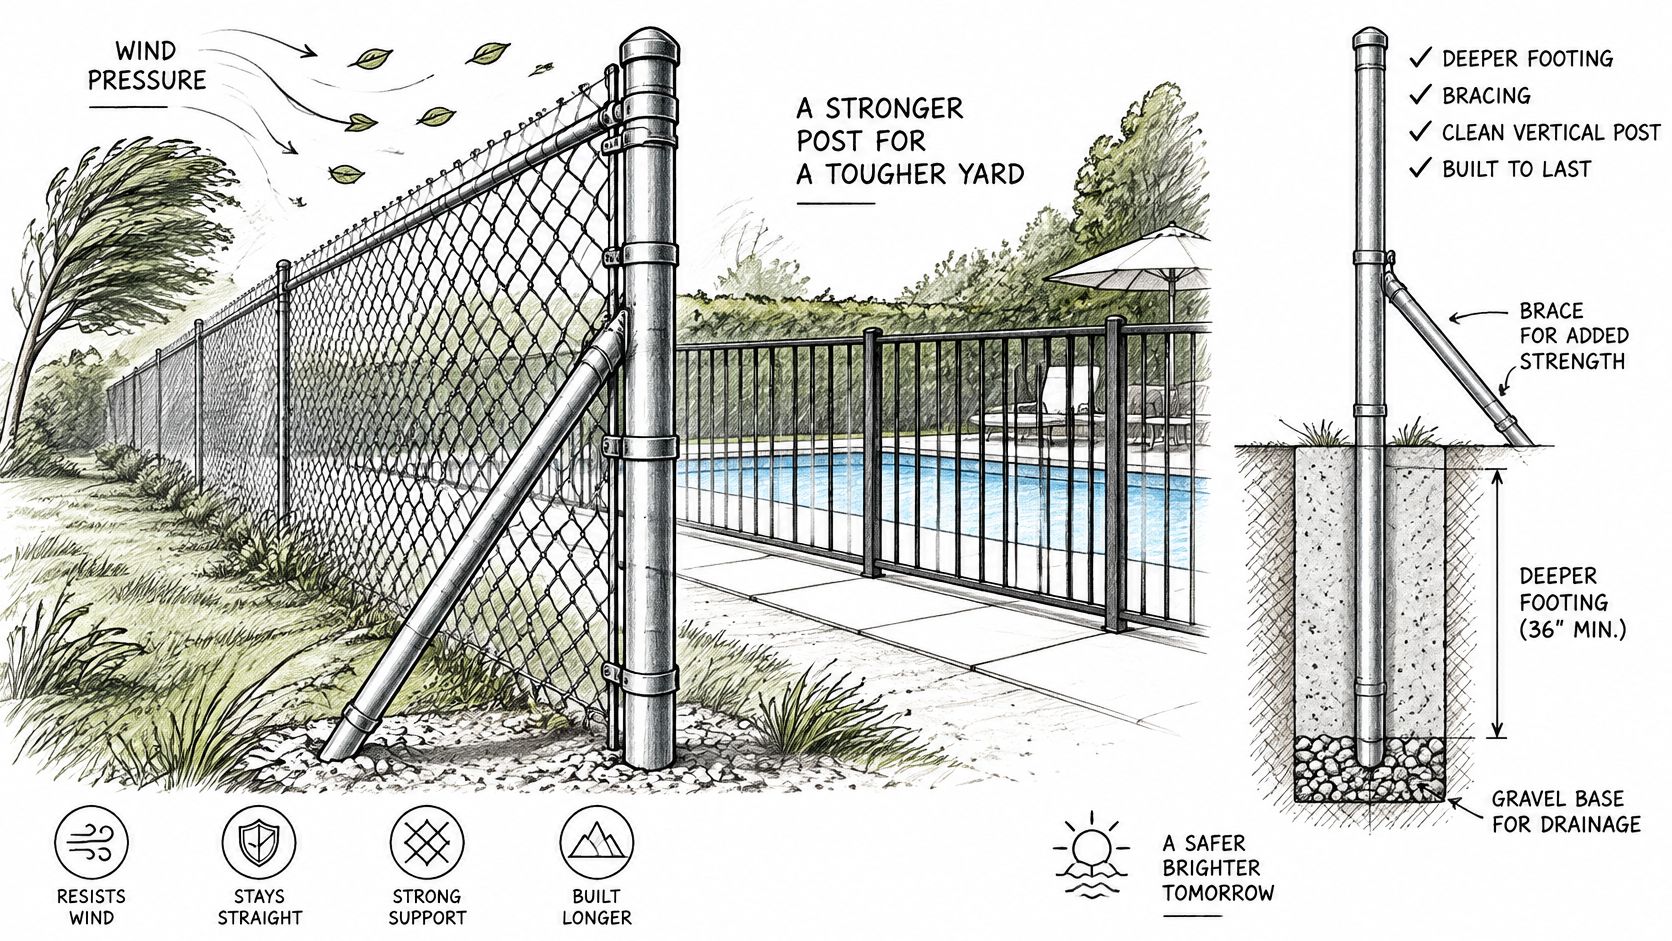
Open mesh doesn't mean negligible wind load. Chain link generally offers less obstruction than solid fencing, but the remaining force still reaches the posts, foundations, terminals, and gates.
The Chain Link Fence Manufacturers Institute wind-load guide selects line-post size and spacing using local design wind speed, fabric configuration, exposure category, and correction factors. That's why a sheltered yard and an open coastal property shouldn't automatically receive identical framework.
Account for changes that catch more wind
Taller fabric, smaller mesh, privacy slats, and attached screening can change the post selection. Adding privacy material after installation deserves a framework review, not just a bag of extra ties.
Corners and gate openings also need individual attention. A manufacturer's table helps select components, but it doesn't replace site-specific engineering where required by code or unusual exposure.
Coastal check: A fence designed for open mesh shouldn't be treated as ready for privacy screening without checking its supporting framework.
Pool barriers have a separate purpose
A boundary fence can contain pets without satisfying pool-barrier requirements. The North Miami Beach chain-link pool-barrier guidance specifies a minimum height of 48 inches, a maximum bottom clearance of 2 inches on the side away from the pool, and standard mesh openings no larger than a 2¼-inch square; larger mesh requires attached slats reducing openings to 1¾ inches or less.
Those dimensions affect fabric selection, grading, and gate coordination. Filling a low spot beneath the fence must preserve the approved clearance rather than create a convenient washout path.
Post spacing and anchorage rules for removable child-mesh barriers must not be confused with ordinary chain-link framework. The selected barrier system determines which structural and fastening provisions apply.
The guide to chain-link fencing around pools helps property owners evaluate the enclosure as a complete safety barrier. Height alone doesn't establish compliance, and an acceptable perimeter layout can still fail at the bottom gap, mesh, gate, or supporting connections.
Common Post Failures and How to Prevent Them
A loose fence doesn't always need heavier pipe. The repair should address the failed part of the load path; otherwise, replacing the visible post can leave the original problem underground.
Diagnose the symptom before selecting the repair
Line posts lean after a storm. Shallow foundations, weak surrounding soil, or loose backfill may allow the entire footing to rotate. Prevention means matching the excavation and foundation to the site, not merely pushing the post upright and packing soil around it.
A corner or gate post rocks. Missing bracing or inadequate anchorage can allow the terminal assembly to move under fabric tension or gate operation. A brace or truss rod must connect a sound assembly; adding one to an already loose foundation won't restore the foundation.
Fabric sags near an end. The terminal may have moved during early tensioning or remained under-anchored. Before stretching the mesh again, check the terminal alignment and footing, because more tension can worsen the movement.
Rust begins at fittings or cut edges. Installation damage and incompatible hardware can expose vulnerable metal. Compatible touch-up coatings and suitable replacement fittings address the cause; the chain-link fence rust guide explains how to distinguish surface treatment from component replacement.
An exposed run loosens repeatedly. The framework may be unsuitable for the site's wind exposure or a later privacy addition. Repeated straightening isn't a design correction, so the repair scope should include post selection, spacing, and foundations.
Keep pool-system repairs within the correct rules
The Florida Residential Code pool-barrier provisions specify a vertical-support resistance of at least 52 pounds, applied 36 inches above grade, and, for child-mesh safety barriers, posts extending at least 3 inches below deck level with spacing no greater than 36 inches.
Those child-mesh dimensions aren't a replacement spacing chart for chain-link line posts. They demonstrate why a pool-barrier repair needs identification of the actual system before selecting posts, anchors, or fasteners.
If a cured post moves by hand, check the footing, bracing, and layout separately. Each fault needs a different repair.
Movement of the steel inside concrete differs from movement of the whole concrete plug in soil. Recording which part moves helps distinguish a damaged post connection from inadequate soil resistance.
Choose the Right Post Plan for Your Property
A workable post plan starts with the loads the fence will carry. Height sets part of the demand, while corners, gates, soil, open exposure, screening, and pool-barrier requirements determine where standard spacing and foundations stop being enough. A residential yard needs a coordinated arrangement of line posts, terminal posts, gate supports, and corrosion-resistant fittings. Commercial and multi-family properties add long runs, repeated gate use, direction changes, and access-control equipment.
Gate posts carry the leaf's weight and closing force. Corner and end posts carry the tension pulling from two directions. Treating those locations as ordinary line posts creates movement elsewhere in the fence.
Pool areas need barrier-specific review before posts, anchors, and gate hardware are selected. Coastal lots need structural and corrosion decisions made together, since a strong post paired with unsuitable fittings can still become a maintenance problem.
Carry a usable checklist into the quote
- Fence dimensions: Total run lengths, desired height, grade changes, and low areas.
- Layout details: Every end, corner, gate opening, and direction change.
- Exposure: Open terrain, nearby salt water, and proposed slats or screening.
- Property requirements: Survey information, HOA restrictions, pool-barrier needs, and permit conditions.
- Excavation planning: Utility-locate status, private lines, roots, stumps, and known obstructions.
- Gate operation: Opening size, intended use, and any operator or access-control equipment.
Use the checklist to compare each bidder's written scope. Post size, wall specification, spacing, hole diameter, excavation depth, embedment, finish, hardware, and bracing should be identified for every run. Without that detail, two quotes can describe different structures behind the same length and fabric.
Compare the included scope
AlliedFenceAndGate.com™ offers chain link fencing in 4-foot and 6-foot heights, with optional barbed wire where additional security is appropriate. Galvanized chain link is listed at $18 to $30 per linear foot installed, while vinyl-coated chain link is listed at $22 to $35 per linear foot installed.
Listed fence prices include professional installation, concrete-set posts, and standard hardware. Gates, operators, and specialty items are priced separately, so an opening with an access-control system needs its own line item rather than an assumption inside the fence price.
The company installs fencing with stainless or hot-dip galvanized hardware and aluminum posts to avoid the common rust problem. Those specifications matter most where soil stays damp, irrigation reaches the fence, or salt exposure shortens the life of ordinary fittings.
For a defined scope before ordering materials, upload a lot survey or property photos through the online estimator at AlliedFenceAndGate.com™ and request a detailed PDF quote. Include the checklist information so gate openings, turning points, exposure, and pool-barrier requirements are addressed in the quote rather than settled during installation.
#MartinCountyFencing #PalmBeachCountyFencing #TreasureCoastFencing #StuartFencing #PalmCityFencing #HobeSoundFencing #JupiterFencing #TequestaFencing #ChainLinkFencing #ChainLinkFencePosts #FenceInstallation #PoolSafetyFencing #CommercialFencing #CoastalFencing
AlliedFenceAndGate.com™ offers chain-link installation and repair for residential and commercial properties across Florida's Treasure Coast and northern Palm Beach County. Visit AlliedFenceAndGate.com™ to upload a lot survey or property photos through the online estimator and request a detailed PDF quote before materials are ordered.
Related Fencing Services
Need a fence or gate on the Treasure Coast?
Licensed, insured, and bonded. Free estimates across Martin, St. Lucie, Indian River & Palm Beach counties.
Call (772) 530-3127