Install Vinyl Fence Post: Florida Step-by-Step Guide

The pallet of vinyl is still strapped in the driveway, the string line is up, and the first bag of concrete is already open. That's when the key questions show up, and they're almost never about the panels. How wide the hole should be, how deep it has to go in sand that drains in minutes, and whether the post will still stand plumb after a summer squall pushes against six feet of solid privacy panel.
A vinyl fence post carries everything above it. Rails, panels, wind load, and in the case of a gate, every swing and slam for the next twenty years. Get the depth, diameter, and concrete work right and the rest of the build is assembly. Get them wrong and no amount of adjusting pulls a leaning run back into line.
What follows is the sequence a Florida crew runs, with the numbers that matter and the places where local rules change the answer. Treat the depth table as a floor, not a promise. Wind exposure, soil, fence height, gates, and the local building official all get a say before the auger bites.
Table of Contents
- Post Hole Dimensions for 4, 6 and 8 Foot Fences
- Check Permits, Wind Rules and Utility Lines First
- When Florida Wind, Soil or Code Calls for Deeper Footings
- How to Dig and Set Each Post Step by Step
- Keeping the Run Straight from Post to Post
- Problems and Fixes After the Posts Are Set
- Decide Whether to Install It Yourself or Hire a Crew
Post Hole Dimensions for 4, 6 and 8 Foot Fences
Most homeowners arrive at this decision with bags of concrete already in the cart. Here's the short answer in one table, then the reason each column exists.
| Fence height | Hole diameter | Minimum depth | Gravel base | Concrete top |
|---|---|---|---|---|
| 4 ft | 10–12 in (25–30 cm) | 30 in (76 cm) | 6 in (15 cm) where specified | 2–3 in below grade |
| 6 ft | 10–12 in (25–30 cm) | 30 in (76 cm), deeper in frost zones | 6 in (15 cm) where specified | 2–3 in below grade |
| 8 ft | 10–12 in (25–30 cm) | About 40 in (102 cm) | 6 in (15 cm) where specified | 2–3 in below grade |
Hole diameter sets how much concrete surrounds the post. Ten to twelve inches gives a solid collar around a standard 5x5 post without turning the hole into a mini excavation. Minimum depth is the floor for the job. Gravel at the base is drainage, and it goes in where the manufacturer's sheet calls for it. Concrete top finishes 2 to 3 inches below grade so soil and turf cover the footing instead of leaving a concrete ring at the surface.
Those figures track published manufacturer instructions. A pre-built vinyl fence installation guide distributed by Lowe's specifies a 12-inch-diameter hole dug to 30 inches deep, 6 inches of gravel for drainage, concrete filled to leave roughly 24 inches of hole depth, and about 2 inches of ground clearance beneath the panel.
Frost is where the table stops being universal. ASTM International's F1999 practice for rigid PVC fence systems covers post installation along with rails, caps, picket tops, and gates, and it's written for sites where maximum frost penetration stays at or below 30 inches (76 cm). The same standard requires installers to weigh end-use conditions and applicable building code requirements when choosing height, spacing, and method. Florida sites rarely raise the frost question, but wind, soil, and gate load land in the same place.
When the sheet disagrees with this table, the sheet wins. Manufacturer instructions and local code control every dimension above.
Spacing has its own rule. Post centers come from the manufacturer's panel dimensions, which means panel width plus post width, measured on the actual product rather than assumed.
A correct set looks like this. The post stands plumb in two directions, the concrete collar slopes away from the post, and the top of the post sits level with the string line. All of it before a single panel goes on. Where the fence is aluminum rather than vinyl, the aluminum fence post still starts from the same depth table, then adjusts for the lighter panel and different hardware.
Check Permits, Wind Rules and Utility Lines First
The panels are on order and Saturday is blocked for the auger. Stop. A permit clerk, an HOA board, and a utility locate can still halt a vinyl job, and each one is a phone call, not a second dig.
The permit question comes first
Material alone almost never decides the permit. The City of Orlando's fence guide says a permit is generally not required only when every listed condition is met, including a height of 6 feet or less where allowed and approved materials such as plastic or vinyl. That guide requires a permit for fences on commercial property or on residential property with three or more dwelling units, for fences taller than 6 feet, and for fences that use concrete, masonry, block, or reinforcement.
Read that against a 6-foot vinyl privacy fence with 5x5 posts on a corner lot. Height is measured from grade. Property type can flip the answer. A reinforced section can do the same. Historic districts add another review on top of the city rule. Call the building department that covers your lot and get the exemption, or the permit number, in writing before you order concrete.
Wind documentation and HOA review
Ask the manufacturer for wind-load paperwork on the exact post system, not the product family. Coastal reviewers in Florida may request it. So will an inspector standing in front of a six-foot privacy panel.
Treat any starting depth table as a floor. Wind exposure, soil, fence height, gates, and local approval can all push the hole deeper, so check those conditions before you dig. Manufacturer instructions and the local code still control the final dimension.
Separately, read the HOA architectural rules for height, color, setback, and style. Tan panels sitting in a neighborhood that only approves white are a wasted order. Pull the survey and mark easements while that file is open.
811 covers public lines, not yours
Utility-damage reporting across the United States and Canada keeps showing the same pattern: a large share of strikes happen because nobody notified the locate service, and more happen when crews dig past painted marks without exposing the line first. Fencing and landscaping work shows up often in the no-notification group. Call. Then pothole.
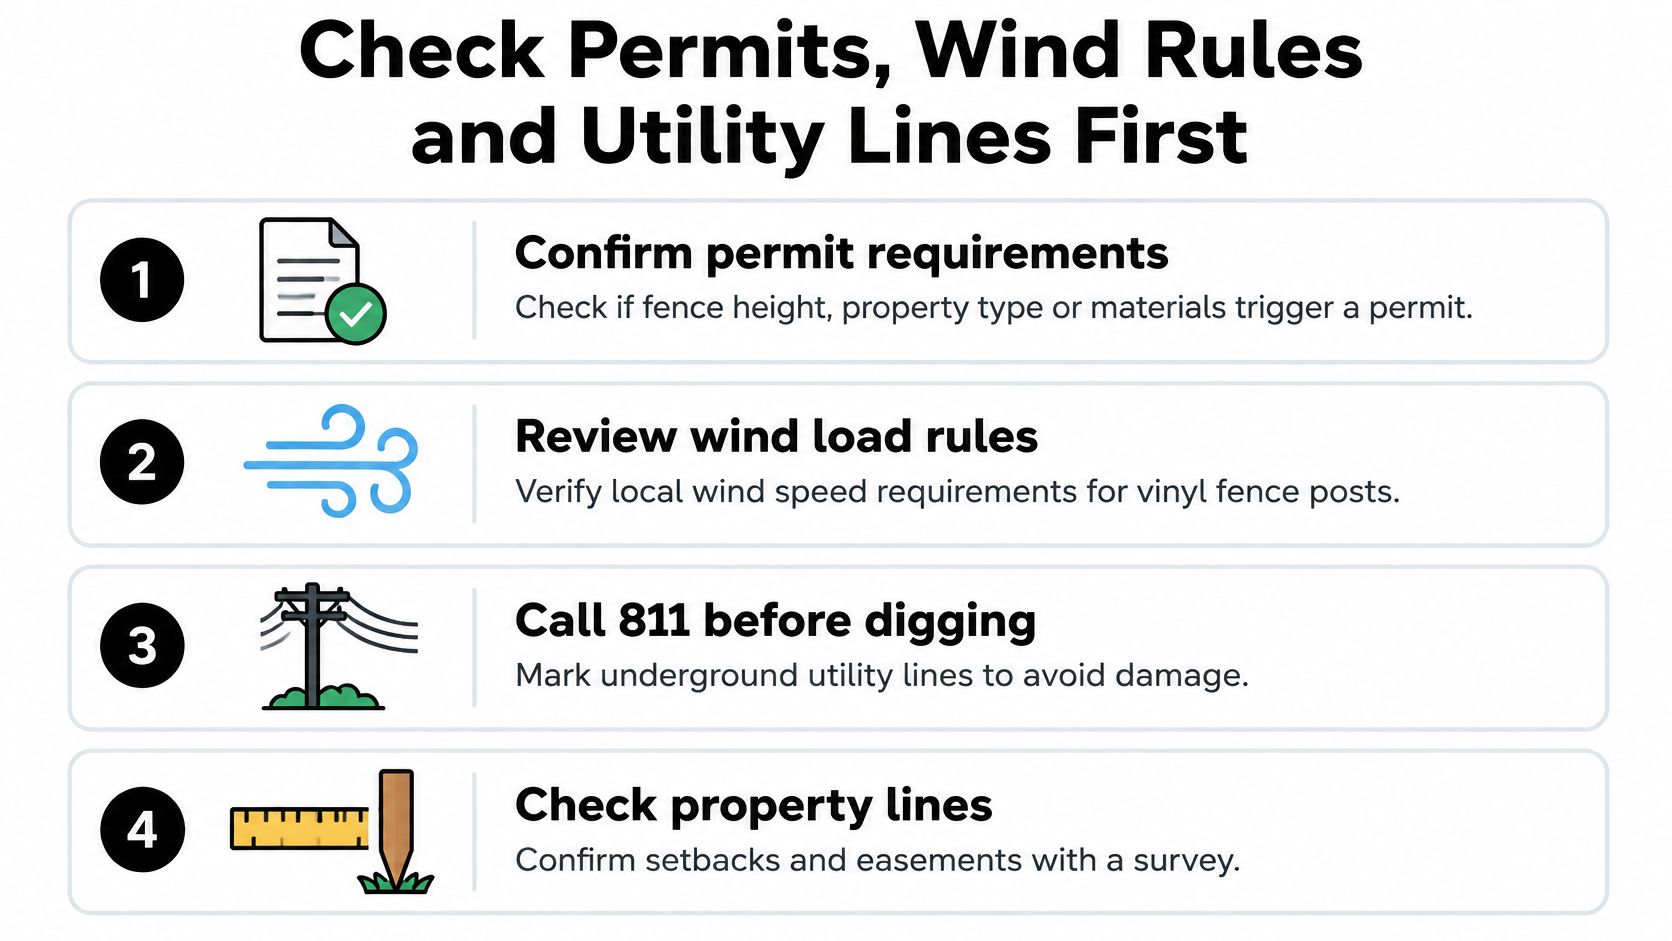
An 811 ticket covers the utility side of the meter. Irrigation, outdoor lighting, private electric feeds, septic components, pool equipment lines, invisible dog fence wire, and telecom runs can all sit on the property side and stay unmarked. Keep the ticket number, photograph every marking, and confirm what each color means against the 811 utility marking color guide before digging. In Miami-Dade County, many non-masonry fence permits require a post-hole foundation inspection before posts are set, so inspection timing matters as much as hole depth.
Tick these off before the auger comes out:
- Permit status: approved, or exempt with the code section noted in writing.
- HOA approval: documented, with the approved color and height on file.
- Locate ticket: number saved, markings photographed from two angles.
- Private lines: irrigation, lighting, pool, septic, and dog fence confirmed by the owner.
- Plan drawing: every post center marked with measured spacing.
When Florida Wind, Soil or Code Calls for Deeper Footings
A comfortable myth says a vinyl post needs two feet of concrete and nothing more. Florida doesn't cooperate with it. Local authorities may review fence location, height, and wind loads, and Florida law requires approved evidence that a construction product or system meets structural wind-load requirements through testing, certification, evaluation, or professional-engineer documentation, as set out in a Cape Coral notice to the industry. A post that feels rock solid the day it's set can still walk under hurricane gusts or seasonal soil movement.
What the site adds to the table
Soil. Sandy lots drain fast and lose lateral support as they dry, so the concrete collar does more of the holding. Clay holds water, swells, and shrinks, and a post set in clay can lift or tilt as moisture swings through the year. A high water table or a low spot that ponds keeps water against the footing long after the rain stops.
Wind exposure. A six-foot solid privacy panel acts like a sail. Coastal lots, open lots without neighboring structures, and long unbroken runs catch more of that load than a picket design with air moving between the pickets.
Height and hardware. Taller fences, corner posts, end posts, and gate posts carry loads that a line post never sees. A gate post absorbs every swing plus the pull of a gate hanging off one side.
Local review. Building officials can treat fence location and height as reviewable items, and documentation requests arrive at the counter, not after the fact.
A decision path that holds up
- Short line fence on sound soil: the table's minimum depth, a full concrete collar, gravel where specified.
- Tall privacy run, coastal exposure, or a heavy gate: deeper embedment plus internal reinforcement sized to the post system.
- Anything beyond that: manufacturer engineering or a signed design from a Florida engineer.
How Florida treats fence height, permitting, and property lines sits in this guide to fence laws in Florida.
The counterintuitive part: a bigger hole isn't automatically safer. An oversized hole with poor drainage, or reinforcement that doesn't match the post profile, fails as readily as a shallow one.
An oversized hole means more concrete to cure and more soil disturbed around the post. Bad drainage keeps water sitting against the footing. A steel insert that doesn't fit the post can split it. Settle the depth decision before the first hole, because every step after it depends on that number.
How to Dig and Set Each Post Step by Step
The hole-size table is a starting floor, not a depth you can copy onto every lot. Embedment rises with Florida wind exposure, soil, fence height, gates, and whatever the building office already approved. Confirm those conditions before the auger comes out. A short line post on firm ground can sit at the table minimum. An 8-foot privacy run, soft fill, or a gate post should already be marked deeper. If the stake still shows the generic minimum and the site is not a simple line fence, reset the depth first. Every step below assumes that number is the one you are digging.
Stage the tools before the first hole. A 100-foot tape, mason's string and stakes, a 4-foot level plus a post level that straps to the post, a post-hole digger or auger, a digging bar for roots, a tamping bar, gravel, bagged concrete, and the locate ticket left where anyone on site can find it.
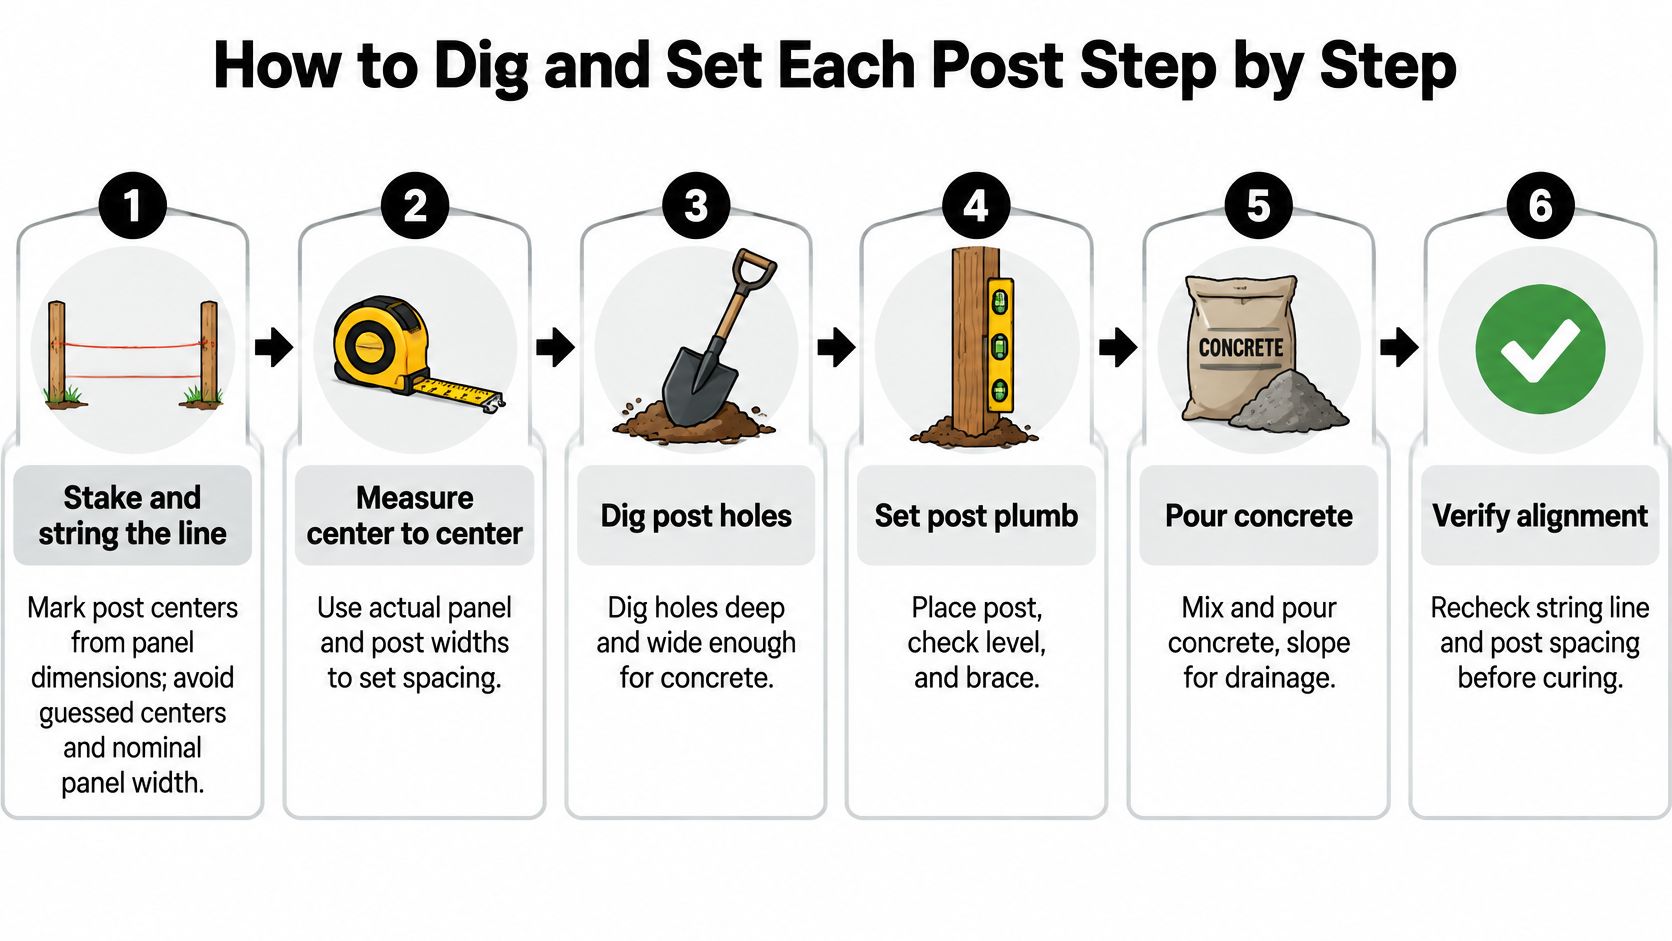
- Stake and string the line, then mark post centers from the manufacturer's panel dimensions. Pull the string tight and set it as the reference for post tops. Centers taken from a nominal panel width miss a little at every hole, and that miss is locked in once the concrete sets.
- Compare each hole location against the locate markings and dig by hand inside the tolerance zone. Hand dig or pothole until the utility is physically exposed. A powered auger beside a marked line is how a fence project becomes a damaged-utility claim.
- Dig 10 to 12 inches across to at least 30 inches deep, about 40 inches for 8-foot fencing. Manufacturer guidance for a conventional vinyl post installation sets those benchmarks and notes that the hole bottom must extend below the local frost line where one exists (vinyl fence installation guide). On a Florida lot, wind, soil, height, and gates are what push the hole past that floor. I would not stop at a fixed 30 inches on a site those conditions already marked as deeper.
- Add about 6 inches of gravel at the base where the sheet specifies it. Drainage keeps water from standing against the bottom of the post. Skip it and the footing holds moisture, which is where movement starts.
- Set the post, check plumb in two directions, and align it to the string. Brace it with 2x4 kickers staked at an angle if the mix is slow to set. Check plumb before the concrete, not after the post is already committed.
- Pour concrete in lifts of roughly 6 inches and tamp each lift. Tamping drives out the air pockets that let a post rock later. One full fill looks faster and leaves voids inside the collar.
- Recheck plumb and line after every lift, and stop the concrete 2 to 3 inches below grade. Soil or turf covers the footing, and water runs off instead of pooling on a flat concrete cap that cracks in the sun.
- Let the concrete cure before loading rails or panels. Loading early is how a plumb post becomes a leaning one. Read the bag's yield chart for the hole you dug, and buy from that chart rather than guessing at the register.
After the concrete has cured, a correctly set post does not move under hand pressure, wears a clean concrete collar, and matches the height of its neighbors along the string. If any of those three is off, fix it before the panels go in. Once rails are seated, the same post is a far more expensive problem.
Keeping the Run Straight from Post to Post
Install in a post, panel, post sequence and measure every center before concrete goes in, using the actual panel and post widths on site. Measure a partial final panel directly, then add the post width to find the next hole center. Nominal panel width alone lets error stack up across a run, and vinyl components are precision-fit, so there's no shimming or forcing a panel into place without visible damage.
The arithmetic explains the risk. A quarter inch of error at each of ten posts puts the last post two and a half inches off the plan, enough to force a panel to be cut or pulled out of line.
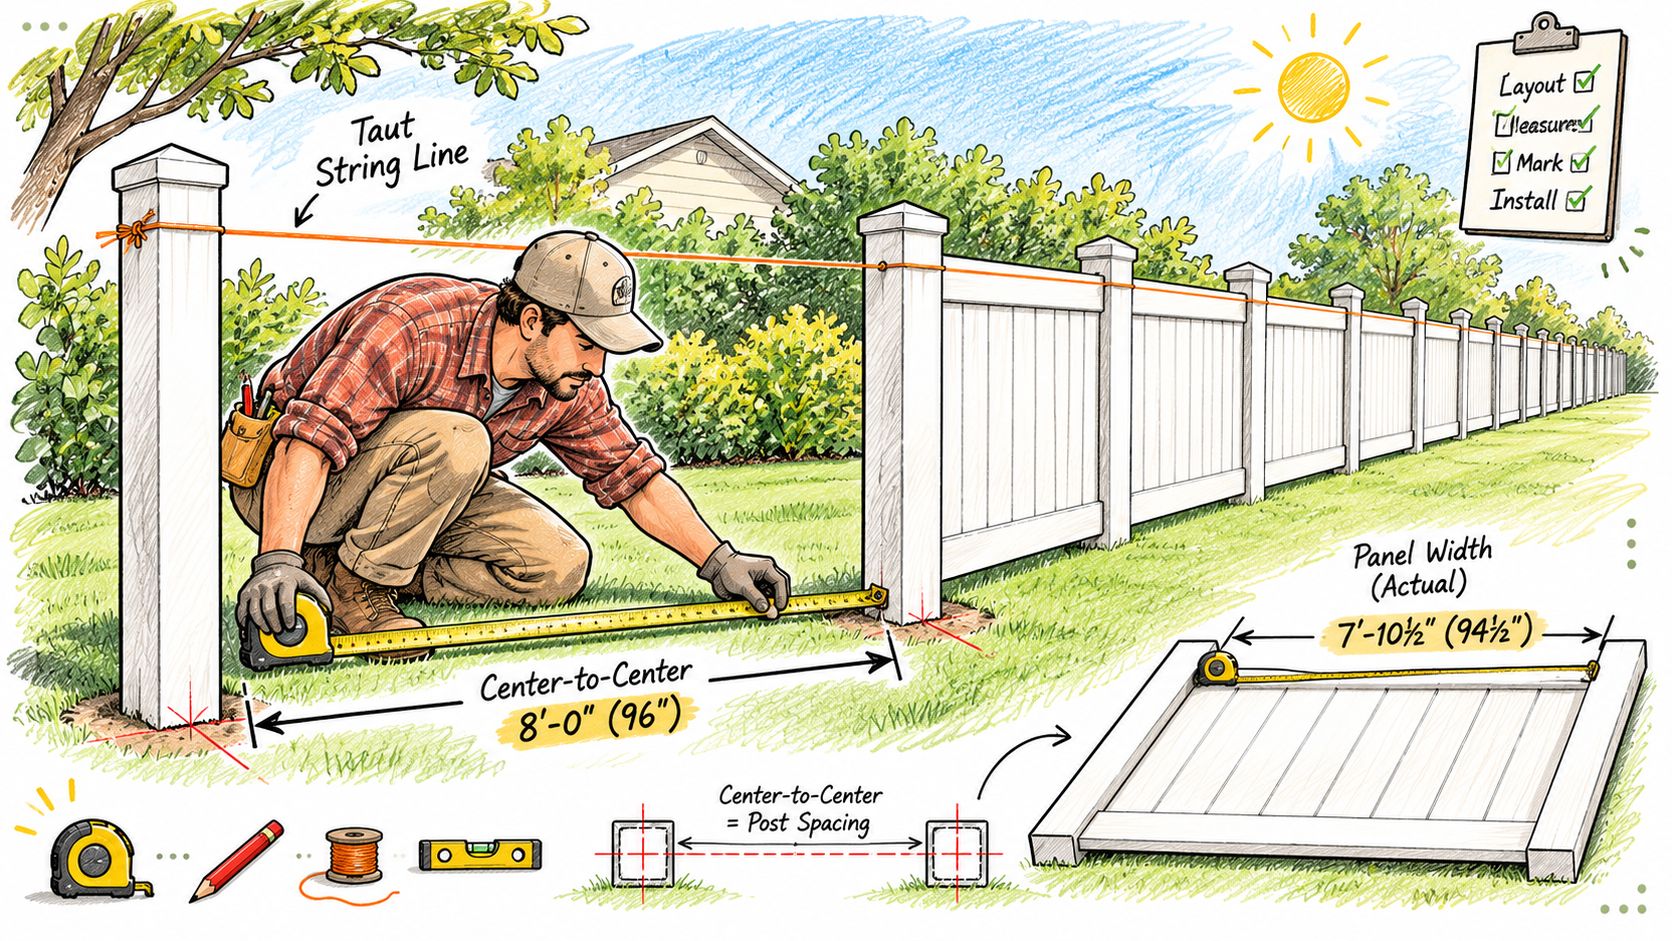
A published vinyl fence system manual recommends exactly that build sequence, pouring in approximately 6-inch lifts with a plumb and level check after each one, curing roughly 24 to 48 hours before rails or panels load the posts, and keeping the finished panel about 2 inches above grade (vinyl fence system installation manual). The manual names guessed spacing and untamped concrete among the failure points its controls exist to prevent.
Run the alignment checks in the order a crew uses them:
- Reference the first post: set a corner or end post and treat it as the datum for the run.
- Sight down the string after each post is set.
- Check every center against the plan drawing before the concrete stiffens.
- Walk the line after the first heavy rain and note any post that shifted.
- Confirm the gate post hasn't drifted out of line with the run it closes.
A run that's straight before any panel goes on stays straight.
Problems and Fixes After the Posts Are Set
Most post failures show up as one of six symptoms, and almost all of them trace back to four causes: concrete loaded before it cured, concrete poured without tamping, spacing guessed instead of measured, and holes too shallow for the site.
| Symptom | Likely cause | Fix |
|---|---|---|
| Post leans within the first days | Concrete not cured or not tamped | Brace and re-plumb before cure; reset if it moved after |
| Post rocks when pushed | Voids around the post from skipped tamping | Dig out the concrete collar and re-pour in lifts |
| Panels do not line up at the last post | Spacing guessed, not measured | Re-measure from actual panel and post widths; adjust the end post |
| Post heaves after a freeze | Hole above the local frost line | Reset deeper below the frost line using the same concrete method |
| Cracked concrete at grade | Concrete finished at grade with no slope | Trim, slope the top away from the post and seal the crack |
| Gate sags on its hinges | Gate post under-embedded or undersized | Reinforce or reset the gate post deeper, then re-hang the gate |
What gets fixed in place
A post that leans while the concrete is still green is the cheapest repair on the list. Straighten it, brace it from two sides with kickers, and leave the braces until the concrete has cured. Cracking at grade is usually cosmetic, and it yields to a chisel, a slope, and a bead of sealant that keeps water out of the collar.
What has to come out
A post that rocks in a cured footing is telling you about voids, and no amount of surface patching fixes it. Break out the collar, lift the post, and re-pour in lifts this time. A post that heaves after a freeze or after a saturated wet season has to be reset deeper, because the problem sits below the concrete, not in it.
Before resetting anything, write down the symptom and the measurement that goes with it. That record is what stops the next repair from repeating the same mistake.
Brace new posts through their first 48 hours if the forecast carries wind, photograph each post both before the pour and after backfill so an inspector can see what was done, and walk the run after the first heavy storm. Small corrections in the first week are minutes of work. The same corrections a season later are a digging bar and a new bag of mix.
Decide Whether to Install It Yourself or Hire a Crew
Five questions settle the decision for most properties: how many posts and linear feet the run covers, whether a permit or inspection visit applies, whether private utilities cross the site, how many gates and corners the layout has, and whether HOA or wind documentation adds steps.
A straight run on a lot with a cleared locate, no permit trigger, and a single gate is a reasonable DIY project for someone comfortable with a level and a saw. Multiple gates, commercial property, coastal wind exposure, or a permit path nobody can explain usually belong with a crew that handles inspections as part of the job.
The sequence a professional crew follows is fixed. Posts go in concrete first, panels and rails go in after the concrete cures, and gates are hung and tuned last. AlliedFenceAndGate.com™ builds PVC fences with reinforced posts, proper footing depth, and engineered spacing for Florida wind loads, and it manages permitting, utility locates, and inspection coordination alongside the install. Homeowners who want a crew can send the survey, HOA rules, and manufacturer sheet for a site review of the permit, locate, and wind-load questions before scheduling.
The next step is the same either way. Gather those documents, call 811, and decide with the permit and wind questions already answered rather than pending.
#VinylFencePost #VinylFenceInstallation #PostHoleDepth #FencePostConcrete #PVCPrivacyFence #WindRatedFence #FencePermitFlorida #811BeforeYouDig #PrivacyFenceFlorida #PoolFenceSafety #DIYFencePost #MartinCountyFencing #PalmBeachCountyFence #TreasureCoastFence #StuartFLFence #JupiterFenceInstall #HobeSoundFence #TequestaFence #PalmBeachGardensFence #FenceContractorFlorida
AlliedFenceAndGate.com™ is a licensed, insured, and bonded fence contractor serving Florida's Treasure Coast and northern Palm Beach County, with permitting, 811 utility locates, and inspection coordination handled on every vinyl project. If your lot's soil, wind exposure, or gate layout makes the depth table a starting point rather than an answer, send the survey and the manufacturer sheet and get the footing designed around the actual site. Visit AlliedFenceAndGate.com™ to start with a ballpark estimate and a site review.
Related Fencing Services
Need a fence or gate on the Treasure Coast?
Licensed, insured, and bonded. Free estimates across Martin, St. Lucie, Indian River & Palm Beach counties.
Call (772) 530-3127