Stair Handrail Hardware: Parts, Specs and Code Guide
The most popular advice on stair handrail hardware is also the most misleading. Buy a strong rail, add heavy brackets, and the stair should pass. On a real flight, the rail rarely fails first. A loose return, a bracket anchored into finish material, or a connector that rotates gives way first, and that one weak termination decides whether the system holds under load and clears inspection.
That's the right way to read every part below. Stair handrail hardware isn't a shopping list of separate pieces. It's one connected assembly, from the anchor buried in the wall to the end cap at the landing, and each piece either preserves a continuous, graspable grip or interrupts it.
Table of Contents
- Stair Handrail Hardware Parts at a Glance
- Brackets, Returns and Newel Connections Explained
- Handrail Heights, Grips and Clearances Required
- How to Terminate Each Rail End to Pass Inspection
- Anchors and Fasteners Matched to Each Wall Type
- Materials That Resist Corrosion on Coastal Stairs
- Load Ratings Every Rail Connection Must Meet
- Sizing and Spacing Specs to Write on the Order
- Cross-References by Problem and Part
- Florida and Commercial Layout Rules and Pre-Order Checklist
Stair Handrail Hardware Parts at a Glance
| Component | Job on the stair | Where it sits | Typical material |
|---|---|---|---|
| Wall bracket | Holds the rail off the wall at set spacing | Wall side of each flight | Stainless 304 or 316, aluminum |
| Newel post | Anchors the rail at the top and bottom of a flight | Ends of the stair | Wood, steel, aluminum |
| Newel cap | Finishes the top of the newel post | Top of the newel | Wood, metal |
| Wall return | Ends the rail back into the wall | Top and bottom extensions | Stainless, aluminum |
| End cap or volute | Closes an open rail end | Rail termination | Stainless, aluminum |
| Goose neck | Connects the rail to the newel where the slope changes | Top of the flight | Metal |
| Rail connector | Joins rail sections along a run | Mid run | Metal sleeve |
| Base flange | Spreads load from the post into the floor | Base of the newel | Steel, stainless |
| Anchor | Fixes the bracket or flange to the substrate | Through the bracket | Stainless, zinc-plated |
| Intermediate post | Supports the rail on wide flights | Mid stair | Metal |
How to Read the Table
Find the part in the table first, then move to the rule that governs it. A wall bracket leads to spacing, wall clearance, and the anchor behind it. A wall return or end cap leads to extension length and termination. A base flange or intermediate post leads to load, substrate, and stair width.
That order matters because returns and end caps aren't decoration. They close the rail, remove a snag point, and bring the extension back to a wall, guard, or landing surface. A pretty cap screwed onto a rail that stops short still leaves a failed termination.
Bracket count follows rail length and load rating, not a fixed kit quantity. Straight runs commonly place brackets about 4 to 6 feet apart as a planning example, with support near each return so the extension doesn't flex. The wall surface also changes the answer, since a bracket is only as strong as the framing, grouted cell, or concrete behind its flange.
Practical rule: Order the assembly, not the rail alone. If the quote doesn't name brackets, returns, connectors, anchors, and end fittings, it isn't a complete hardware list.
For comparison, a single 13-step flight with two newels typically needs a rail run, wall brackets along the enclosed side, a newel at each end with caps and base flanges, a goose neck or transition at the top, a connector if the rail ships in sections, returns or end caps at both terminations, and anchors matched to each mounting point. An open side adds posts instead of wall brackets. Counting parts against that baseline exposes missing returns and undersized anchors before fabrication starts.
Brackets, Returns and Newel Connections Explained
Wall Brackets
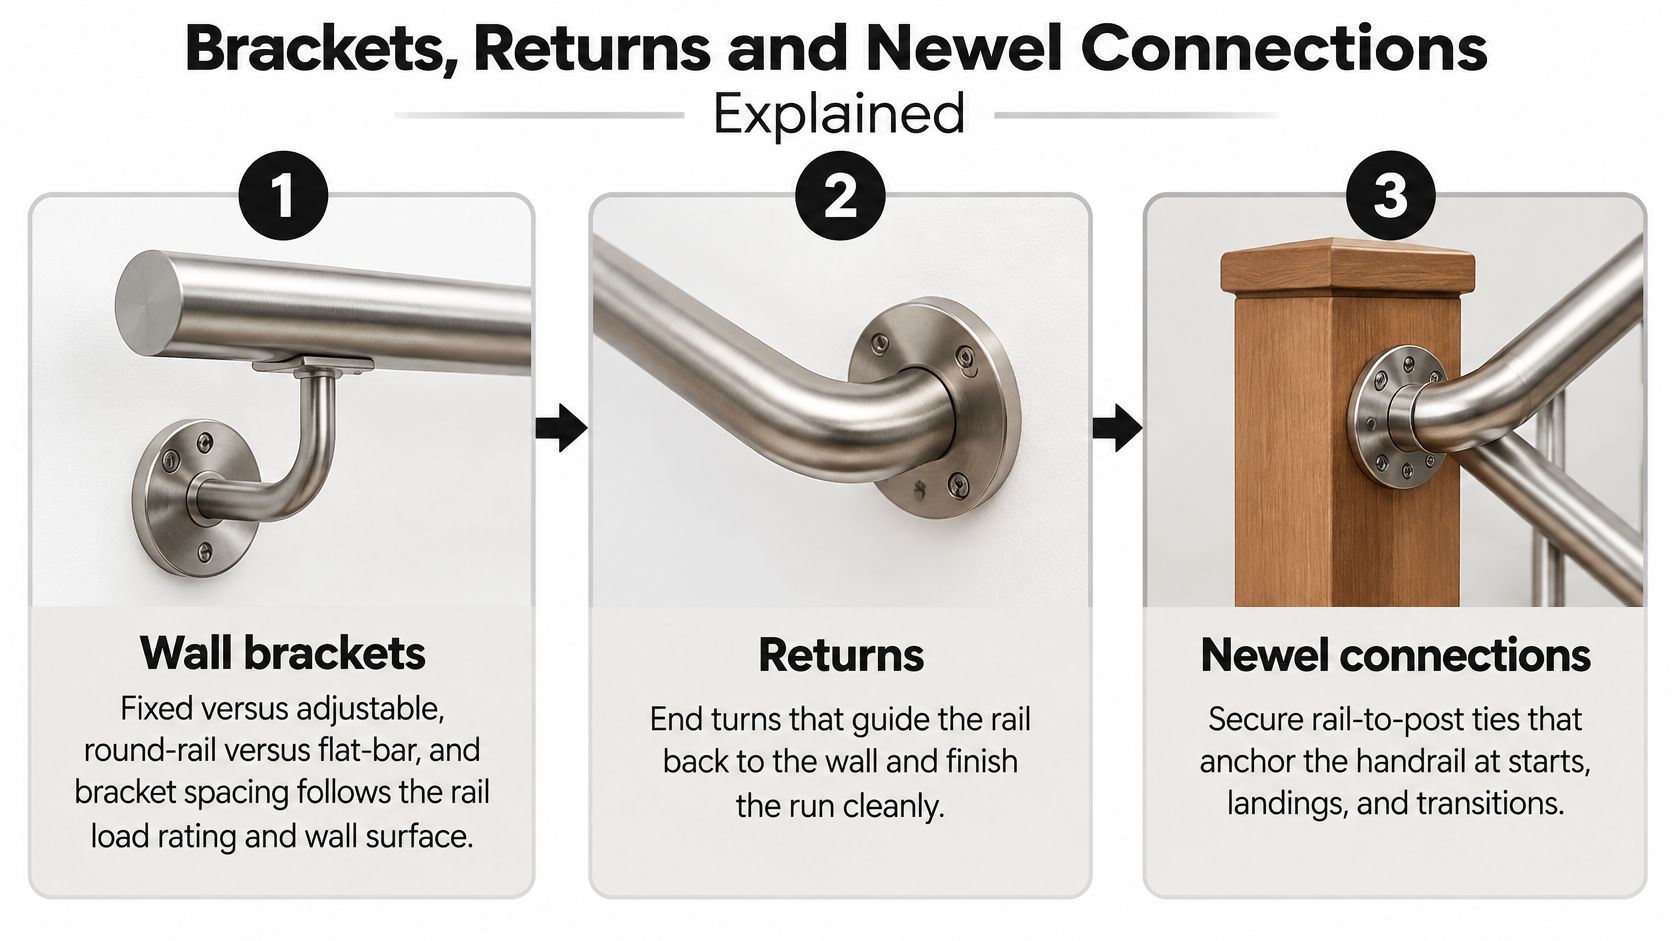
A fixed bracket suits a straight, predictable run where the wall is plumb and the rail angle doesn't change. An adjustable bracket earns its cost on stairs with uneven walls, winder transitions, or a pitch that needs fine alignment at the saddle. The trade-off is movement. Every pivot or set screw is one more point that can loosen if it isn't locked and checked after the rail is loaded.
The saddle must match the rail underside. Round-rail brackets cradle tube, while flat-bar brackets support a flat bottom profile. Swapping them creates point contact, rocking, and a grip that feels solid in the middle but shifts at the ends. Spacing follows the rail's rated span and the wall surface, so a stiff stainless tube into concrete and a lighter aluminum rail into framing shouldn't automatically share the same layout.
Returns and Transitions
A wall return turns the rail back into the wall and closes the gap where clothing, bags, and hands can catch. A return elbow or volute finishes an open end where there's no wall to receive it. Both do real work, because an open, square-cut end is a snag hazard and an inspection problem, not a style choice.
The goose neck handles a different problem. It lifts or turns the sloped rail into the level rail or newel at the top of a flight without a sharp kink in the gripping surface. The best fitting is the one that keeps the hand moving smoothly while holding the rail off the wall at a consistent clearance. A return that pulls the rail too close to the wall can pass a tape check for length and still fail as a usable grip.
Place a bracket close to each return. The extension beyond the last support is where flex, rotation, and loose end fittings show up first.
Newel Connections
A through-bolted newel flange spreads load into the tread, landing, or floor structure and suits high-traffic commercial stairs. A side-mounted plate helps where top mounting would crowd the walking width or where the post lands on a stringer face. A sleeve with set screw joins rail to post quickly, but it's the least forgiving option if the tube size is slightly off, since the set screw can dent, slip, or allow rotation.
Wide flights add an intermediate bracket or post so the center rail doesn't rely on long, springy spans. Say a straight wall-side run in a worked example measures 14 feet, uses six brackets, two returns, and one goose neck. The bracket nearest the top return matters most because users pull down and outward as they leave the last tread, loading the extension and its return at the same time. Spacing the other five perfectly doesn't compensate for a weak top termination.
Before ordering, match three facts to the connection. Note whether the rail is round or flat, whether it lands on a wall or a post, and whether the angle changes at that point. Those answers select the bracket saddle, return, and newel tie without guesswork.
Handrail Heights, Grips and Clearances Required
The hardware has to land the finished rail inside narrow dimensional bands, and the bands differ by code path. Under the 2010 ADA Standards for Accessible Design, a circular gripping surface requires an outside diameter of 1.25 to 2 inches (31.8 to 51 mm), and a non-circular handrail must have a perimeter of 4 to 6.25 inches (102 to 159 mm) with a cross-sectional dimension no more than 2.25 inches (57 mm).
That same federal reference, published September 15, 2010, widened the earlier 1.25 to 1.5 inch range from 1991. The point isn't nostalgia. An older rail that matched the narrower range can still be undersized for a secure grasp, and a decorative oversized profile can be too large for a hand to close around during a slip. Compliance sets the geometry, but the profile inside that range still affects fall recovery.
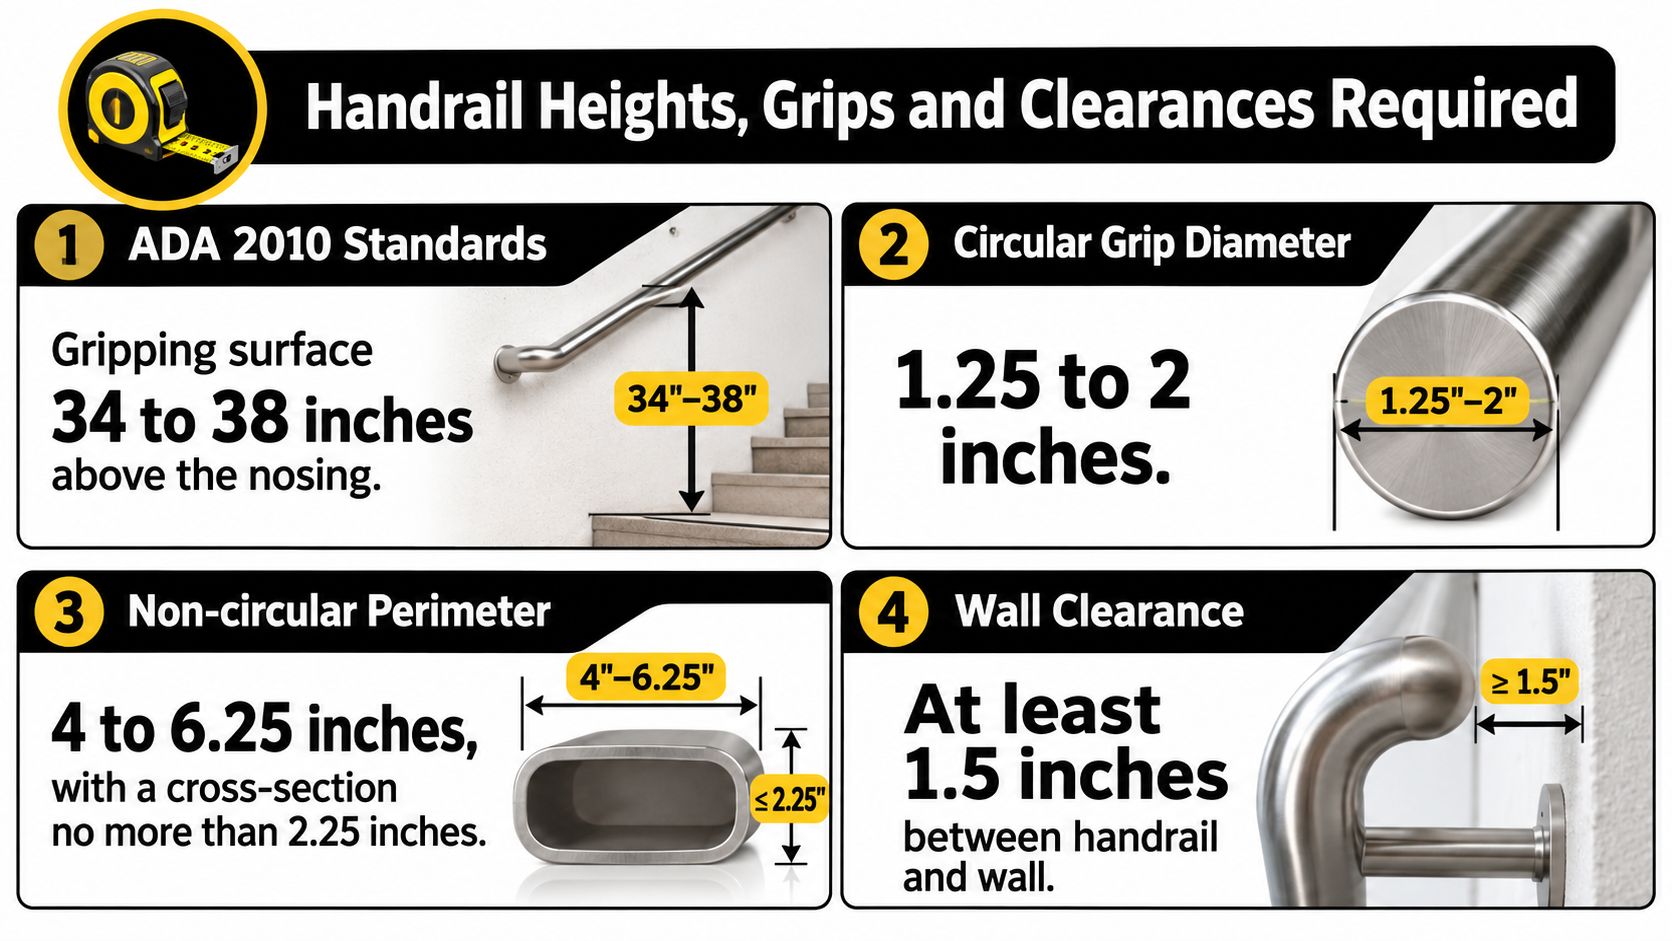
| Requirement | ADA 2010 Standards | OSHA general industry |
|---|---|---|
| Handrail height | 34 to 38 inches above nosing | 30 to 38 inches above tread leading edge |
| Circular grip diameter | 1.25 to 2 inches | Use the ADA range on accessible stairs |
| Non-circular perimeter | 4 to 6.25 inches, cross-section 2.25 inches maximum | Use the ADA range on accessible stairs |
| Wall clearance | 1.5 inches | 2.25 inches |
Why the Measurement Point Changes the Result
Height is measured to the top surface of the assembled rail, not to the bracket centerline, saddle, or underside. A taller bracket, a thicker rail, or a return fitting that lifts the profile can move a layout that looked correct on paper out of range once it's assembled. That's why height can't be signed off from a catalog drawing alone, a point covered in the guide to stair handrail heights and measurement points.
Clearance needs the same field check. The ADA value protects finger space behind the grip, while OSHA general industry requires more room from adjacent objects. Temporary construction rails use a still larger minimum, so copying a construction detail onto a permanent accessible stair creates the wrong hardware offset.
Field check: Record height above the nosing, grip diameter or perimeter, and clearance behind the rail after assembly. Those three lines catch most dimensional failures.
Don't average readings along the flight. Measure at the top, middle, and bottom, since tread variation and bracket placement can tilt the rail. A rail that's correct at mid-flight and low at the landing still isn't correct where the user reaches for it first.
How to Terminate Each Rail End to Pass Inspection
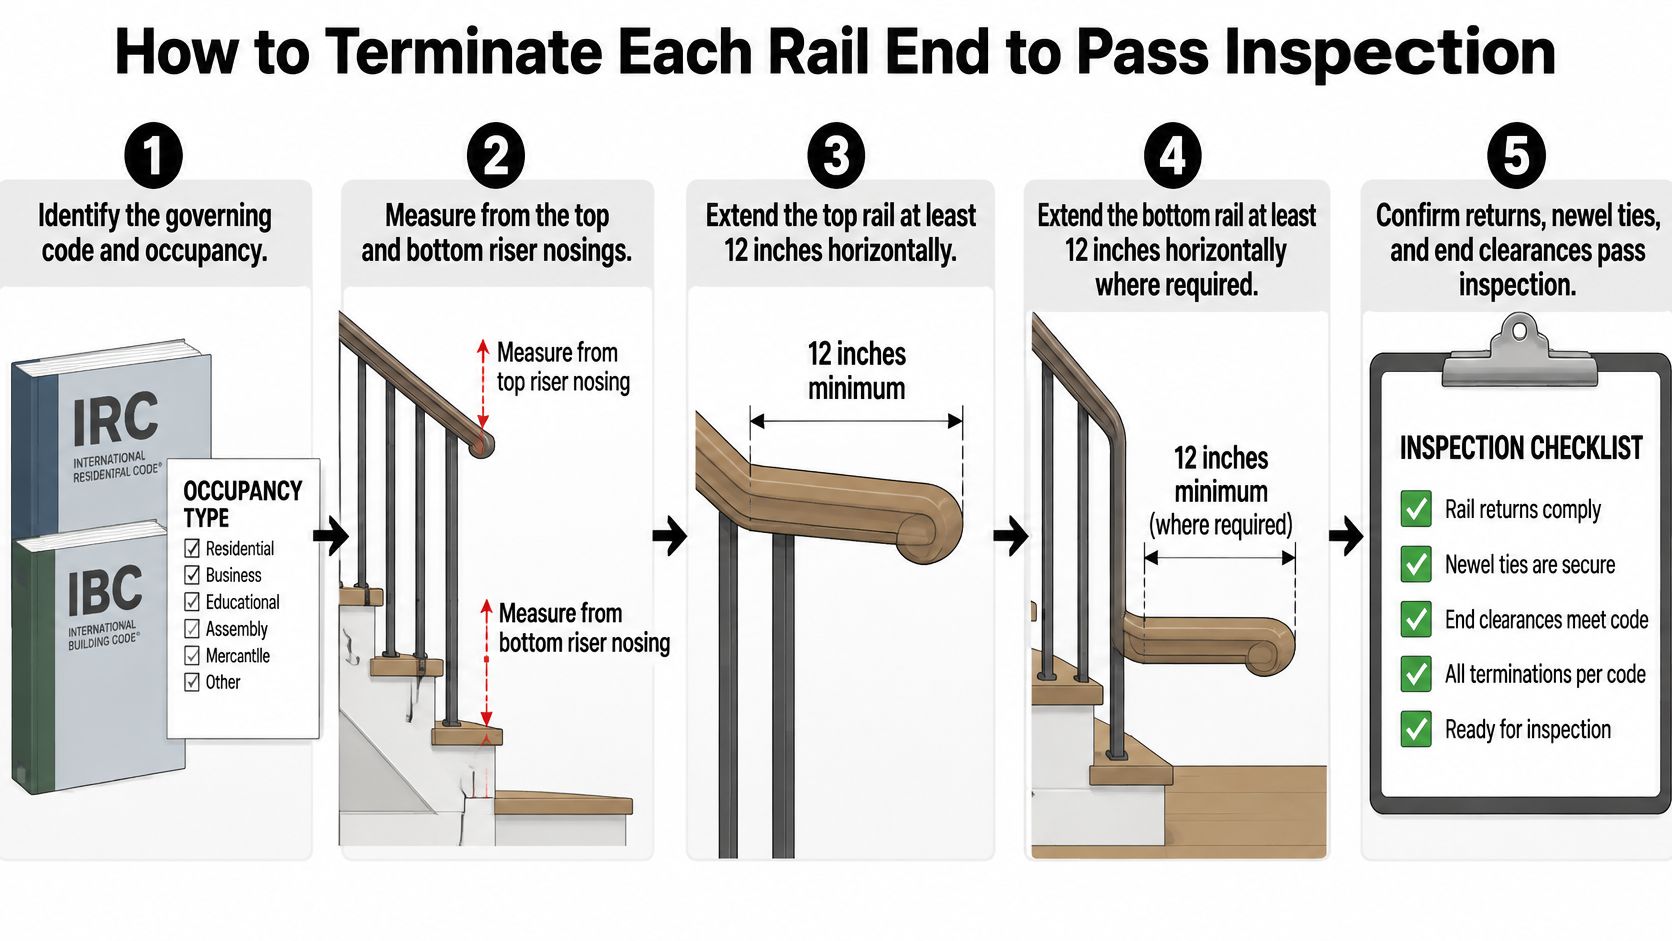
A rail can measure the right overall length and still fail at its ends. The 2010 ADA Standards for accessible stairs require handrails on both sides of accessible stairs, a top extension continuing horizontally at least 12 inches (305 mm) beyond the first riser nosing, and a bottom extension continuing along the stair slope for at least one tread depth beyond the last riser nosing.
Termination Audit
- Identify the governing code and occupancy. Public, commercial, multifamily, and healthcare stairs face accessibility review that a private interior flight may not.
- Measure from the top and bottom riser nosings. Extensions start at the nosing line, not at the wall, newel face, or last bracket.
- Extend the top rail horizontally over the landing. The user needs a level grip before the first step down, not a rail that's already dropping away.
- Extend the bottom rail along the slope, then level where required. Stopping at the last riser removes support while the user's weight is still moving forward.
- Return each end to a wall, guard, or landing surface, or connect it to an adjacent rail. An unsupported open end can catch clothing and flex under load.
- Confirm the fitting doesn't rotate in its mount. A return elbow that twists breaks the continuous grasp and loosens its fasteners over time.
- Check rounded edges and clearances. Brackets, caps, and posts shouldn't project into the grip path or leave sharp, abrasive edges.
Where Correct Length Still Fails
Say the bottom extension reaches the required distance but ends in a short, squared cap beside the walking path. The length passes a tape check. The termination still creates a snag point, and the last bracket may sit too far back to keep the extension rigid. Return elbows, goose neck transitions, and intermediate supports solve that problem only when they're located during layout, not added after the rail is cut.
Document stair geometry, tread depth, landing space, and adjacent walls or guards before fabrication. An inspector will ask how the extension was measured, where it returns, and whether the grip stays continuous. Photos with a tape at each nosing, plus the fitting list, answer those questions faster than a verbal assurance.
Anchors and Fasteners Matched to Each Wall Type
| Substrate | Recommended anchor | Installation note |
|---|---|---|
| Poured concrete | Wedge or sleeve anchor | Sized to flange holes, with proper edge distance |
| Concrete block | Epoxy-set threaded rod or sleeve anchor | Set in a grouted cell, not a hollow cell |
| Solid wood framing | Structural lag screws or through-bolts | Engage blocking, not trim or drywall |
| Steel stud or steel post | Machine screws with backing plate | Check steel gauge before drilling |
| Drywall over stud | Screws into located framing | Toggle bolts and plastic anchors cannot carry rail load |
| Brick or stone veneer | Engineered masonry anchor | Confirm veneer thickness and mortar joints first |
Concrete and Block
Poured concrete gives an anchor solid material in every direction, provided the hole keeps enough edge distance to avoid cracking the face. Wedge and sleeve anchors must match the bracket flange holes, since an undersized shank in an oversized hole shifts before it clamps. Concrete block is less forgiving. Epoxy-set threaded rod or a sleeve anchor belongs in a grouted cell, because a hollow cell offers a thin shell that can crush or pull through under outward load.
Framing and Steel
Wood framing needs structural lag screws or through-bolts into blocking or studs. Trim, drywall, and siding only hide the fastener, they don't carry it. On steel studs or posts, machine screws need a backing plate and a gauge check first. Thin steel can strip at the threads while the bracket still feels tight during installation.
Drywall is the common trap. Locating framing with a stud finder, then confirming with a small pilot hole, takes minutes. Toggle bolts and plastic anchors spread load across gypsum, which crumbles under repeated pulling. That's unsuitable for a rail people grab during a fall, as detailed in the guide to ADA handrail installation and mounting substrates.
Veneer and Load Direction
Brick or stone veneer needs its thickness and mortar joints confirmed before drilling. The anchor may need to pass through veneer into the backup wall, and a hole centered in weak mortar won't perform like one in sound masonry.
Pull-out tries to draw the anchor straight from the wall. Shear pushes it sideways or down. A handrail connection must resist both, because a user falling outward and downward loads the bracket in both directions at once.
Record the substrate, anchor type, diameter, length, and embedment for each mounting point on the order. One flight can cross concrete at the landing and framed wall along the slope, so a single fastener note for the whole stair isn't enough.
Materials That Resist Corrosion on Coastal Stairs
Stainless 304 is the common choice for indoor stairs and mild exterior exposure. It resists everyday humidity, cleans easily, and suits brackets, returns, and connectors away from direct salt spray. It isn't rust-proof in a coastal stairwell, though. Tea staining and pitting can start at fasteners and crevices where salt sits.
Grade 316 stainless adds molybdenum for better chloride resistance and is the safer specification close to salt water. The Richelieu Hardware handrail bracket listing lists brackets compatible with 304 and 316 stainless steel components, which helps when matching a bracket system to the rail grade rather than mixing parts by appearance.
Aluminum doesn't rust, weighs less, and works well for brackets, posts, and sleeves. Its weakness is contact with dissimilar metals. Aluminum touching carbon steel or some stainless fasteners in a wet, salty joint can corrode at the contact point, so the connection needs a non-conductive gasket or isolation sleeve and compatible fasteners.
Hot-dip galvanized steel suits structural posts and base flanges where strength matters more than a polished finish. Field cuts and drilled holes expose bare steel, so those edges need touch-up before assembly. Zinc-plated or painted hardware belongs indoors only. The coating is thin, and once a wrench or anchor hole breaks it, coastal moisture reaches the steel quickly.
Say a coastal Florida porch rail uses 316 brackets and 316 fasteners with aluminum post sleeves. The specification should add isolation gaskets where aluminum meets stainless, sealed end caps so tube interiors don't hold water, and the same grade for small screws as for the visible brackets. Cheap fasteners are where coastal hardware usually fails first.
Write the finish and grade for every part on the order, including anchors, set screws, connector sleeves, and caps. Stainless rail on zinc-plated screws isn't a stainless system. It's a mixed-metal assembly with a short-lived weak point.
Load Ratings Every Rail Connection Must Meet
A bracket package that looks heavy isn't automatically strong. Under OSHA construction stairrail rules, handrails and stair-rail top rails must resist, without failure, a 200-pound (890 N) force applied within 2 inches (5 cm) of the top edge in any downward or outward direction at any point along the rail.
What the Test Loads
That force doesn't stop at the rail tube. It travels through the bracket saddle, flange screws, anchor, substrate, rail connector, and newel bolts. A connector sleeve that slips a quarter inch, a flange that bends, or a lag screw that pulls from blocking all count as connection failures even when the rail itself doesn't bend.
Say two lag screws fasten a bracket near the edge zone of one concrete block. The bracket can rock, crush the shell, and pull out under an outward grab. Centered through-bolts with a backing plate in the same wall spread the force and can pass. Same rail, same bracket casting, different anchorage, opposite result.
The load rating belongs to the assembled rail in its actual wall, not to a bracket tested alone on a supplier's bench.
Documentation to Request
Ask the supplier for pull-out and lateral load documentation tied to the exact bracket, fastener, spacing, and substrate. A generic catalog value for concrete doesn't prove performance in grouted block, steel studs, or wood blocking. The submittal should name rail material and section, bracket spacing, fastener type and diameter, embedment, and any anti-rotation detail at connectors and returns.
Finish with a hands-on field check. Push down, pull outward, and tap along each connection to find movement, hollow sounds, or a fitting that rotates. Verify height, clearance, rigidity, returns, and the absence of sharp projections before acceptance. Movement that's easy to feel by hand won't improve under a falling user.
Sizing and Spacing Specs to Write on the Order
A fabricator shouldn't have to infer stair handrail hardware from a photo and a rail length. Write the order as a spec the shop, installer, and inspector can all check against the same numbers.
- Rail profile. State round or non-circular, the outside diameter or perimeter, wall thickness where relevant, and the material. Don't write only a finish color.
- Bracket spacing. Set spacing from the rail's load rating and wall surface, using about 4 to 6 feet on a straight flight only as a planning example. Add support near each return and note any stud or grouted-cell locations that force a shift.
- Intermediate supports. Mark added posts or center rails on wide flights, with their exact position so they don't reduce required clear width.
- Newel connection. Name the base flange size and whether the tie is through-bolted, side-plated, or a sleeve with set screw. Note the floor or tread material under each flange.
- Fastener. Give diameter, length, embedment, and substrate for every anchor type. Separate notes for concrete, block, wood, and steel prevent one wrong fastener bag reaching the site.
- Finish and isolation. State 304, 316, aluminum, or hot-dip galvanized for each part. Add gaskets or sleeves wherever dissimilar metals meet.
- Returns and end caps. List the return elbow, wall return, volute, goose neck, or cap for each rail end, plus which wall, guard, or landing it returns to.
Attach the finished list, field measurements, and substrate notes to the purchase order. If a substitution changes the saddle shape, flange hole pattern, or fastener grade, the spec gets revised before fabrication. That paper trail turns a vague hardware allowance into an installable assembly.
Cross-References by Problem and Part
Use the symptom to find the part, then read only the rule that fixes it. This index keeps a repair or pre-order review under a minute.
- Rail wobbles under weight. Check anchors, blocking, grouted cells, and flange fasteners first, then review Anchors and Fasteners Matched to Each Wall Type and Load Ratings Every Rail Connection Must Meet.
- Rail stops short of the landing. Replace or extend the termination with the correct wall return, return elbow, or goose neck, then follow How to Terminate Each Rail End to Pass Inspection.
- Rail sits too high or too low. Adjust bracket height or saddle selection and remeasure from the nosing to the top surface using Handrail Heights, Grips and Clearances Required.
- Bracket stains, pits, or corrodes. Replace the bracket and its fasteners as a matched grade, isolate dissimilar metals, and check Materials That Resist Corrosion on Coastal Stairs.
- Rail fails inspection. Recheck extensions, returns, clearances, stair width, and the Florida layout exceptions in Florida and Commercial Layout Rules and Pre-Order Checklist.
- Connector rotates or the grip feels interrupted. Replace the sleeve or set-screw fitting with an anti-rotation connector and confirm bracket placement in Brackets, Returns and Newel Connections Explained.
- Mixed metals meet at one connection. Add an isolation gasket, match the fastener grade to the bracket, and cross-check Materials That Resist Corrosion on Coastal Stairs with the anchor table.
- Parts list doesn't match the stair. Rebuild the order line by line from Sizing and Spacing Specs to Write on the Order, starting with rail profile and ending with both terminations.
One pattern repeats across every problem. The visible rail is rarely the first correction. The anchor, return, connector, or fastener grade behind it usually decides whether the repair lasts.
Florida and Commercial Layout Rules and Pre-Order Checklist
Layout rules change the hardware count before material or finish enters the discussion. The 2023 Florida Building Code provisions summarized by Miami-Dade County require stair flights to have handrails on each side, while flights within dwelling units and spiral stairways may have a handrail on one side only.
That summary also limits the platform-lift exception to stairs with no more than two risers, a handhold beside the top landing, a handhold 34 to 42 inches above the bottom landing, and a gripping surface at least 4.5 inches long. Treating that narrow exception as a general residential shortcut leads to missing rails and failed review.
Commercial width adds another count. Under the OSHA stair handrail width guidance, stairs narrower than 44 inches (1.1 m) generally require at least one handrail, stairs 44 to 88 inches (1.1 to 2.2 m) wide require a handrail on each enclosed side, and stairs wider than 88 inches (2.2 m) require an additional intermediate handrail. Replacement work also needs an installation-date check, because older dimensions should not be copied onto new hardware.
Pre-Order Checklist
- Substrate at each anchor point. Concrete, grouted block, blocking, steel, and veneer each need a named anchor.
- Stair width and layout band. Width decides side rails and whether an intermediate rail enters the count.
- Riser count and landings. These decide extensions, returns, and any narrow Florida exception.
- Code path and occupancy. Florida Building Code, ADA, and OSHA duties can overlap on commercial stairs.
- Material by exposure. Coastal and humid sites need matched grades, not only a corrosion-resistant rail.
- Load-tested end connections. Confirm returns, newel ties, and anchors as one assembly.
AlliedFenceAndGate.com™ is a licensed ADA compliant contractor, and every fastener, hinge, and latch installed is stainless steel or marine-grade. For layout context on larger properties, review the options for commercial aluminum railing systems, then send stair measurements and photos and request a written hardware list with anchor and material notes before scheduling a site visit.
#TreasureCoast #MartinCounty #PalmBeachCounty #StuartFlorida #JupiterFlorida #PortStLucie #StuartFencing #FloridaContractor #StairHandrails #HandrailHardware #ADACompliant #ADAStandards #FloridaBuildingCode #StairRailing #CommercialRailings
AlliedFenceAndGate.com™ installs ADA compliant commercial hand railings, wheelchair ramp railings, stairway handrails, and pool safety fencing, with stair handrail hardware specified as a complete anchored assembly rather than a rail and bracket kit. Send the stair width, riser count, substrate photos, and landing conditions for a written hardware list that names brackets, returns, anchors, fasteners, and material grades before fabrication. Start the request at AlliedFenceAndGate.com™.
Related Fencing Services
Need a fence or gate on the Treasure Coast?
Licensed, insured, and bonded. Free estimates across Martin, St. Lucie, Indian River & Palm Beach counties.
Call (772) 530-3127