ADA Handrail Stairs Requirements: A Florida Building Guide
Most stair handrail failures in Florida aren't height failures. They're geometry failures. The ADA's stair rules have long been highly dimensional, and the 2010 Standards for Accessible Design kept that prescriptive approach while refining continuity, grip shape, and extension details that inspectors still check line by line in the field on ADA stair and handrail standards.
Simplified guides usually camp on diameter and height because those are easy to summarize. What gets missed is the layout discipline behind compliant ADA handrail stairs: where the nosing line is established, how the top and bottom extensions terminate, whether returns are clean, and whether the inside rail on a switchback stays continuous. Those are the details that separate a pass from a callback.
Table of Contents
- Why ADA Handrail Stairs Compliance Matters in Florida
- ADA and Florida Building Code Stair Handrail Requirements
- Design and Material Options for Coastal Stair Handrails
- Mounting Heights, Brackets, and Clearance Specifications
- Common Inspection Pitfalls and How to Avoid Them
- Maintenance Practices for Coastal Handrail Installations
- Planning a Code-Compliant ADA Handrail Stairs Project
Why ADA Handrail Stairs Compliance Matters in Florida
Florida stair handrail compliance gets decided in the layout, not in the punch list.
On active jobs, I see the same problem over and over. The stair is framed, finishes are selected, and the rail gets treated like a late add-on. That is when callbacks start. If the handrail does not track the nosing line correctly, if the extension stops short, or if the return is left open at the landing, the rail can fail inspection even though the fabrication itself looks clean.
That matters fast in Florida. Failed finals delay certificates of occupancy, push trades back into finished areas, and turn a simple rail correction into patchwork across tile, drywall, and paint. On public-facing properties, the exposure is not just construction delay. It is opening a building with a stair condition that does not meet accessibility requirements.
The costly part is that many of these misses are avoidable. The rail height may be right and the profile may be graspable, but inspectors still look at how the system works as a continuous handhold from the first nosing to the landing termination. On switchback stairs, that inside continuity is where a lot of installers get into trouble. Prefab sections that fit the plan view do not always satisfy the required grip path once the stair is built in the field.
What gets checked in the field
Inspectors do not stop at a tape check on rail height. They look at whether the installation was laid out from the stair geometry itself.
Common failure points include:
- Top and bottom extensions: Rails that stop at the last riser or die into the landing edge are frequent correction items.
- Clean returns: Open rail ends can fail inspection and create a catch point for clothing, bags, or mobility aids.
- Continuity through turns: Switchback and dogleg stairs often lose the grip line where sections meet or where a fabricator breaks the run for convenience.
- Nosing-based layout: The controlling reference is the nosing line. If the wall brackets were set from finish floor instead, the whole run can drift out of compliance.
I tell owners and supers the same thing on walkthroughs. If the nosing line was not established first, the handrail install is already at risk.
Florida jobs leave little room for field guessing
This hits mixed-use buildings, multifamily common areas, clubhouses, schools, medical offices, and commercial tenant spaces especially hard because the stair rail has to satisfy accessibility requirements, inspection expectations, and day-to-day durability at the same time. Those goals do not always line up with an off-the-shelf kit or a decorative profile picked early in design.
Good-looking rails fail every week for predictable reasons. The bottom extension gets trimmed back to protect circulation space. The return floats instead of tying back cleanly. The inside rail on a switchback breaks where the user expects a continuous grip. None of those errors look dramatic on a plan sheet. All of them can stop a final.
The jobs that pass with less rework usually start the same way. The team fixes the nosing line, landing edges, and wall condition first, then builds the rail around that geometry. That is the discipline Florida inspections reward.
ADA and Florida Building Code Stair Handrail Requirements
Florida stair handrail work fails on geometry more than on intent. The plans may call for an ADA-compliant rail, but inspectors do not pass intent. They verify height off the nosing line, continuity through the full flight, grip size, extension layout, and whether the returns terminate cleanly.
The baseline dimensions are clear. Stair handrails are set 34 inches to 38 inches above the nosing line under ADA stairway guidance. On site, that means every mark starts from the nosing, not from the tread field, not from the finished landing, and not from a bracket height pulled off a floor-to-floor dimension.
The dimensions that control fabrication and layout
Grip profile is where decorative selections start getting ruled out. Circular handrails are limited to 1 1/4 inches to 2 inches in outside diameter. Non-circular profiles must stay within the ADA grip limits for perimeter and cross-section, so bulky custom shapes often look fine on a shop drawing and fail once someone checks them in hand.
Continuity matters just as much as size. On Florida work, the rail needs to read as one usable grip line for the full flight, and switchback or dogleg stairs get extra scrutiny at the inside rail where fabricators like to break the run for convenience. If that inside grip line is interrupted at the turn, expect comments.
ADA vs Florida Building Code stair handrail requirements
| Requirement | ADA / Florida expectation | Field impact |
|---|---|---|
| Handrail height | 34 to 38 inches above stair nosings | Lay out from each nosing, then confirm the rail stays in range through the full run |
| Circular grip size | 1 1/4 inches to 2 inches OD | Limits oversized ornamental profiles |
| Non-circular grip size | Must remain within ADA graspability limits | Forces early profile approval before fabrication |
| Continuity | Continuous for the full stair flight. Inside rail on switchbacks and doglegs is a common enforcement point in Florida | Affects splice locations, corner fittings, and landing transitions |
| Returns | Rail ends must return to wall, guard, or floor | Changes end fittings, extension length, and bracket placement |
| Extensions | Top and bottom extensions must be laid out to the stair geometry, not guessed from plan notes | Bottom conditions are a frequent retrofit problem |
Where crews get tripped up
Extension details cause more rework than the basic height rule. Top extensions get shortened to avoid crowding a landing. Bottom extensions get flattened too early, or the rail returns before it has completed the required run past the last riser. Both errors are easy to miss until final inspection because the rail still looks finished.
Older details are part of the problem. Many fabricators still carry legacy shop standards from earlier ADA cycles or prior Florida details, especially on retrofit jobs. If the shop builds from an old template and the field crew installs it without checking current enforcement expectations, the bottom extension is often the first place the mismatch shows up.
What inspectors focus on
The cleanest installs start with a disciplined reference line and hold that line through every transition point. In the field, these are the checkpoints that matter:
- Nosing line first: Height compliance is measured from the nosings through the run, not from slab or finish floor elevations.
- Continuous grip path: Splices, fittings, and switchback turns cannot interrupt the user's hand travel.
- Top extension geometry: The extension has to relate to the top riser and landing condition, with the return detailed so it does not create a snag point.
- Bottom extension geometry: The rail should continue with the stair slope where required before leveling or returning.
- Return termination: Open ends fail. The rail end needs to die into a wall, guard, or floor with a fitting that still preserves usable clearance.
Bracket layout is part of this, too. A compliant rail profile can still fail if a bracket or post placement pushes the gripping surface out of reach or breaks the hand path at a fitting. On stairs with tile buildup, wall furring, or thick skirts, I check the finished wall condition before the rail goes to fabrication. That one step avoids a lot of field cutting and patched returns.
Good stair handrail layout is not complicated. It is precise. If the crew establishes the nosing line early, confirms the extension paths before powder coat, and treats the inside switchback rail as a continuous grip instead of a convenient break point, the inspection goes much smoother.
Design and Material Options for Coastal Stair Handrails
Coastal stair rails fail at the details long before they fail structurally. In Florida, the material has to resist salt and sun, but it also has to hold clean geometry at returns, landings, and switchbacks after fabrication, coating, and installation.
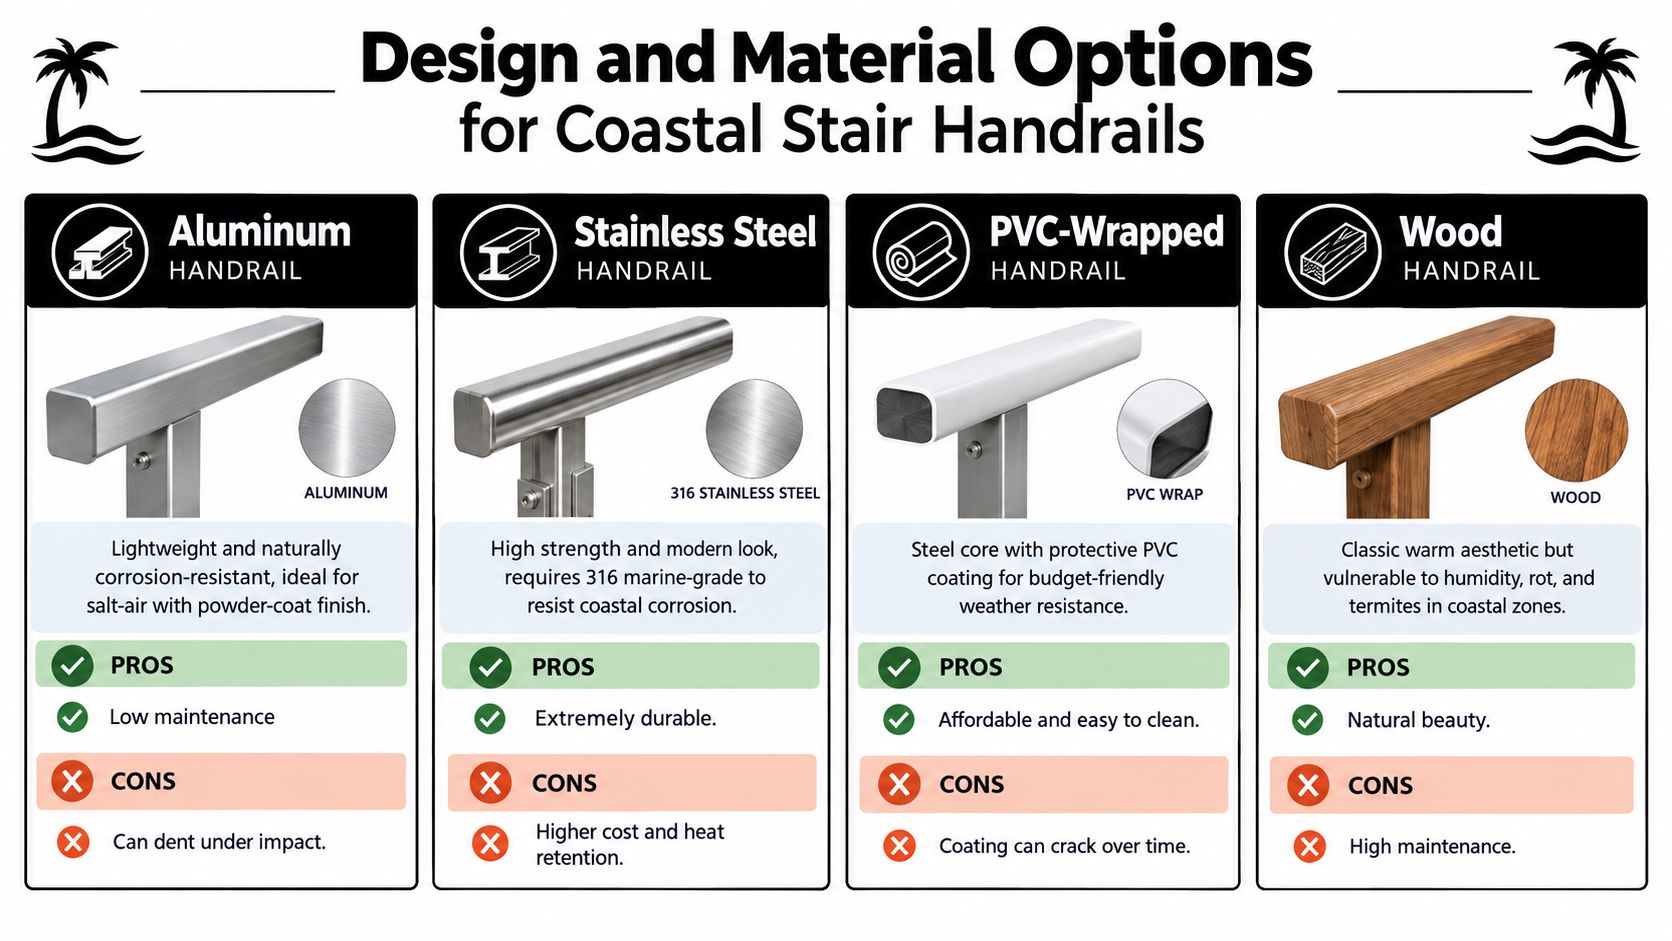
Aluminum, stainless, PVC, and wood compared in the real world
Aluminum is the exterior default on a lot of ADA handrail stairs I install, especially for multifamily, municipal, and pool access work. The reason is simple. It fabricates cleanly, takes powder coat well when the pretreatment is right, and gives enough control over bends, returns, and extension pieces to keep the rail consistent from the first tread to the landing. Near the water, raw mill-finish aluminum starts looking tired fast, even when the base metal is still sound.
Stainless steel is a good choice when the owner wants a bare-metal finish and is willing to pay for the right grade and finish. Near salt exposure, the conversation should start at 316 marine grade, not 304. Stainless also shows layout mistakes more clearly than powder-coated aluminum. If the return is out of line, the extension kicks too high, or the inside switchback joint is uneven, polished stainless does not hide it.
PVC-wrapped aluminum cores fit some budget-driven jobs, but they need more scrutiny than sales sheets usually suggest. The sleeve still has to produce a rail that can be gripped through the full run, including any fittings at the ends. Some wrapped systems also get bulky at corners and returns, which can turn a clean shop drawing into an awkward field condition once the rail meets a wall, post, or guard.
Wood is usually the wrong call for open coastal stairs. It can look good on a covered entry or an interior run, but exposed wood moves, checks, and loses finish. The other problem is shape. A lot of decorative wood profiles feel substantial in the hand but do not maintain the disciplined, graspable section accessible stairs need.
Material choice affects geometry, not just durability
The rail tube is only part of the decision.
On coastal jobs, I look at whether the material can hold a smooth return without welding distortion, whether the finish can survive field touch-up at cut ends, and whether the bracket and fastener package will age at the same rate as the rail itself. A well-shaped handrail still becomes a callback if the stainless screws tea-stain, the powder coat chips at the return, or the fabricated extension lands too close to a corner to keep the grip usable.
Switchback stairs expose weak material choices quickly. Inside-turn continuity is easier to execute with systems that allow tight, controlled fittings and predictable bends. Bulky post caps, oversized fittings, and decorative transition pieces often create the exact interruptions inspectors and users notice first.
For property owners weighing exterior systems, this guide to outdoor ADA handrail options for steps is a useful starting point for sorting exposed installations from sheltered ones.
Choose the handrail as a full assembly: rail profile, brackets, returns, anchors, fasteners, and finish. On coastal stairs, the weak point is usually at the connection or termination, not in the middle of the tube.
Mounting Heights, Brackets, and Clearance Specifications
A handrail can feel solid, look straight, and still fail inspection because the layout was taken from the wall instead of the stair. On ADA handrail stairs, inspectors are checking geometry. Height, clearance, bracket projection, and how the rail tracks the nosing line all have to work together.
Start from the nosing line, not the finished wall
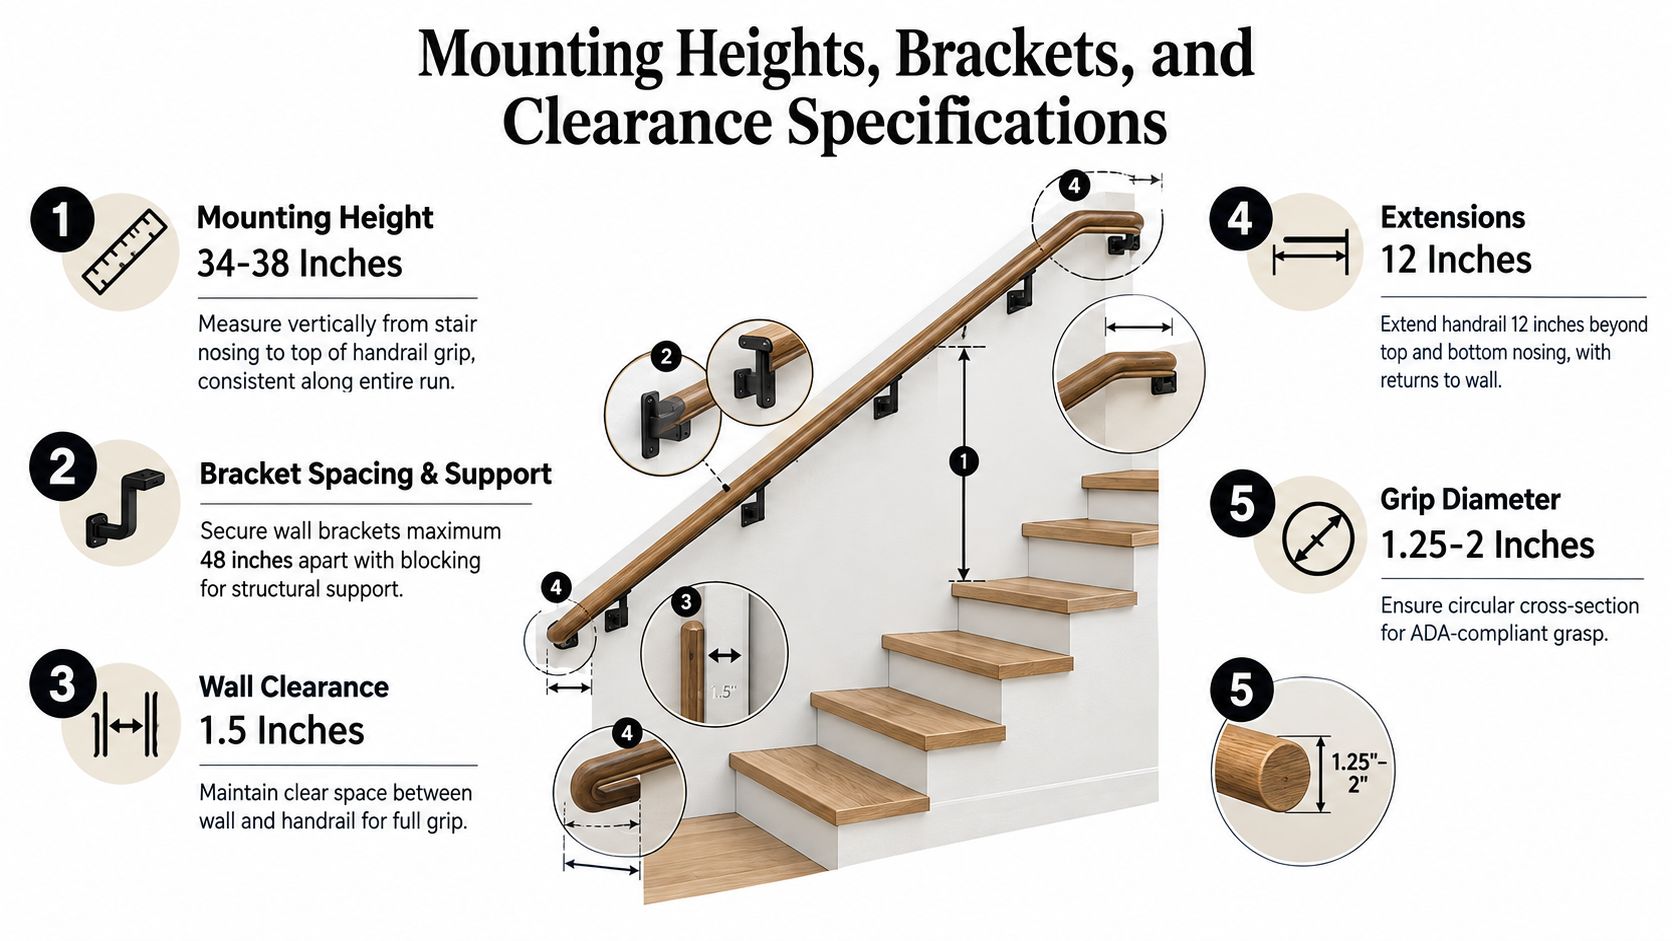
The height has to stay between 34 and 38 inches above the stair nosings. In the field, that means laying out a true nosing line first, then measuring vertically to the top of the gripping surface at multiple points. One correct reading at the bottom step does not save a rail that drifts high at the landing or drops low through a switchback.
Wall conditions cause a lot of bad installs. Wavy block, furred walls, tile build-up, and heavy trim can push the rail in or out enough to affect both height and usable grip. I see this on retrofit jobs all the time. The fabricator builds to plan, then the finish thickness changes the bracket stand-off and the rail no longer lands where the stair geometry says it should.
Clearance matters just as much. The target installers watch is 1 1/2 inches minimum between the rail and the wall or other solid surface, because that is what preserves full finger wrap.
Brackets need structural support without breaking the grip path
Bracket selection is not just a hardware decision. It controls where the hand sits, how far the rail stands off the wall, and whether returns and extensions can be built cleanly at the ends.
Good bracket layout follows a simple order:
- Strike the nosing line across the full run. Use a laser if the stair has more than one flight.
- Set bracket locations from the rail geometry. Do not let stud location alone dictate the handrail line.
- Mock up the stand-off depth before drilling. Finish materials can reduce clearance fast.
- Check each bracket for hand interference. A support that crowds the underside of the rail can break the usable grasp even if the assembly feels strong.
For attachment methods, stand-off options, and substrate-specific hardware, this breakdown of stair handrail mounting bracket details is a solid reference.
Short brackets can create knuckle pinch points. Deep brackets can push the rail out of height range at corners or returns. On exterior concrete stairs, the wrong base plate location can also put anchors too close to an edge, which turns a code issue into a repair issue.
Multi-flight stairs are where layout discipline shows
Switchbacks expose every shortcut. If the upper run is laid out by following the wall instead of projecting the stair line, the rail often loses continuity at the inside turn or arrives at the landing with the wrong extension geometry. That is exactly the kind of miss simplified guides gloss over and inspectors catch.
A clean install keeps the rail line visually steady and dimensionally tied to the nosings from first tread to last return.
On wood framing, backing has to be where the brackets belong, not merely where framing happened to land. On masonry, anchors need enough embedment and edge distance to resist movement over time. A rail that flexes, rotates, or forces the user to shift grip around a badly placed bracket is not a finished ADA handrail stair installation.
Common Inspection Pitfalls and How to Avoid Them
Inspectors rarely fail ADA handrail stairs for the obvious miss. They fail the stair that looks clean, feels solid, and still breaks down at the exact points where a user needs uninterrupted support most.
On Florida jobs, the trouble usually shows up in four places: the top extension, the bottom extension, the return, and the inside path at a switchback. Height still matters, but it is often not what holds up final approval. The inspector is usually checking whether the rail was laid out from the stair geometry itself, especially the nosing line, or whether someone followed the wall and hoped the ends would work out.
Where handrails fail most often
Top and bottom terminations cause a lot of avoidable corrections. A rail that stops at the landing edge can look finished and still fail. The same goes for a bottom end that dies too early, kicks into a post too soon, or turns before it has carried past the last riser far enough to preserve the intended support zone.
Returns are another common miss. Open ends, sharp cutoffs, and decorative scrolls create snag points and usually invite comments from the inspector. A proper return closes the end back to a wall, guard, or landing surface without leaving a projecting hook.
Switchbacks separate careful layout from guesswork. The inside rail has to let the user keep a continuous hand path through the turn. If the fabricator resolves that corner after the fact instead of on the shop drawing, the rail often arrives with a break in continuity, a bracket conflict, or an extension that no longer lands where the stair geometry says it should.
Handrail Inspection Failure Points
| Pitfall | What Inspectors Check | Field Fix |
|---|---|---|
| Rail cut off at landing edge | Top extension is carried past the top riser in the required horizontal run | Lay out from the nosing projection, not the wall face, and verify the extension before fabrication |
| Bottom extension ends abruptly | Rail continues beyond the bottom riser far enough before returning | Mock up the lower end full scale so the slope break, level run, and return all fit the actual stair |
| Open rail end | End returns cleanly to a wall, guard, or landing surface | Use a formed or welded return instead of leaving a free end |
| Inside switchback rail breaks | User can keep contact through the inside turn without a forced release | Resolve the corner geometry on the shop drawing and field-check it against landing dimensions |
| Decorative grip too bulky | Gripping surface stays within allowable grasp dimensions | Check the actual profile with calipers before powder coat or final install |
| Bracket blocks the grip path | Hand can slide past supports without knuckle traps or grip interruption | Change bracket type, shift spacing, or revise the return so the support stays out of the grasp zone |
A better pre-inspection routine
The best pre-inspection tool is still a pencil line on the wall.
Chalk the nosing projection first. That gives the mechanic, fabricator, and superintendent one reference that does not drift. From there, mark the rail height off the nosings, then mark where the extension begins and ends. If those marks are guessed from the landing slab or drywall corner, the rail can be wrong before the first bracket is drilled.
I also want the crew to test the return condition before final welding or final anchor holes. That matters at walls, at guard tie-ins, and especially at switchbacks where a small field dimension change can ruin continuity. A handrail can meet the stair for most of its run and still fail at the last 10 inches.
One last check catches a lot. Walk the inside path by hand, the same way an inspector or user will. If the hand has to lift, twist around a bracket, or hunt for the next section, the stair is not ready for sign-off.
Maintenance Practices for Coastal Handrail Installations
Coastal handrails usually fail at the connection points first, not the rail tube itself. Salt air gets into fasteners, wall brackets loosen under daily use, and small shifts at the returns or extensions can turn a passing installation into a callback.
An inspection routine that catches code drift early
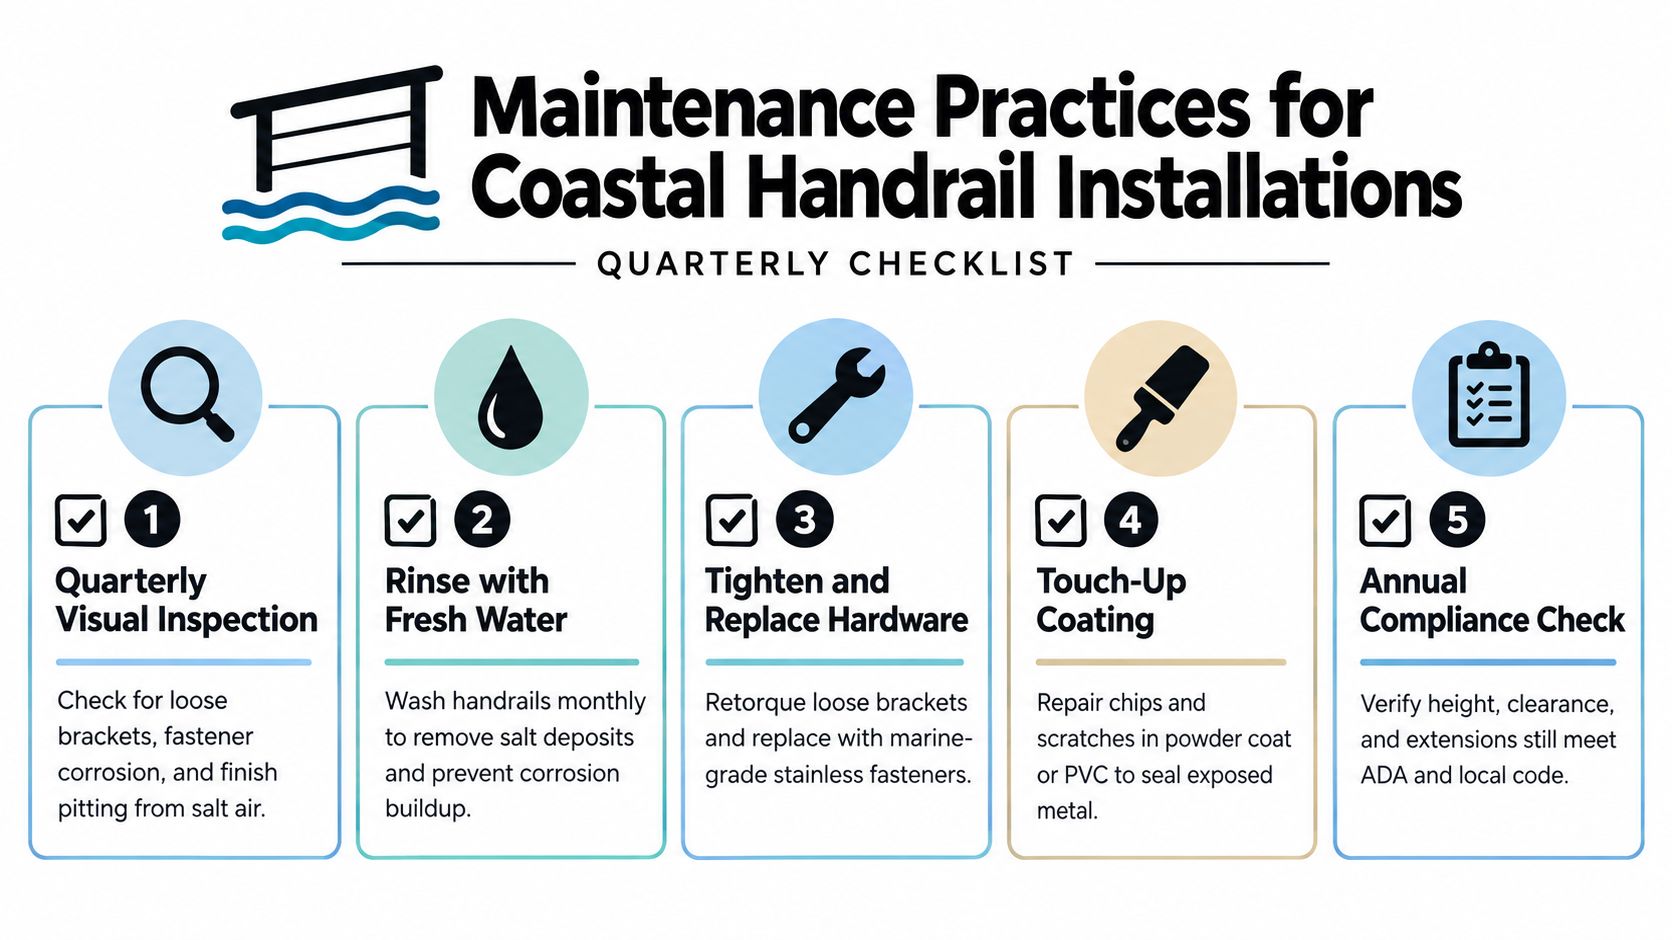
On Florida coastal jobs, I want maintenance staff looking at these rails on a set schedule, not only after a tenant complaint. Quarterly checks are practical for most multifamily and commercial properties. They catch movement before the substrate gets wallowed out or corrosion spreads into the anchors.
The check should focus on function, not just finish.
- Bracket movement: Grab the rail and load it the way a user would on the stair descent. Any flex at the bracket, base plate, or return needs attention.
- Corrosion at mixed-metal connections: Stainless hardware in aluminum, exposed carbon steel, and neglected cut edges are common failure points near the coast.
- Damage at extensions and returns: Bottom returns get hit by carts, cleaning gear, and foot traffic. Top extensions loosen at the wall more often than owners expect.
- Grip-path obstructions: New signs, security wiring, wrapped finishes, or amateur repairs can reduce clearance or interrupt the hand slide.
- Switchback continuity: At stacked landings, verify the user can still carry a hand through the turn without a snag, sharp offset, or dead stop.
Inspectors do not care that the rail looked straight from ten feet away. They check whether the graspable path still works where the stair begins, where it turns, and where it terminates.
Cleaning that helps instead of causing damage
Salt film holds moisture against the finish. If it stays there, hardware stains, coatings break down faster, and corrosion starts in places the owner rarely sees.
A basic wash with fresh water, a pH-neutral cleaner, and a soft brush is usually the right approach on coated aluminum and stainless systems. Harsh chloride cleaners and abrasive pads create their own problems, especially on stainless returns, exposed fastener heads, and powder-coated surfaces. Rinse well. Residue left behind around brackets and wall flanges tends to collect grime and moisture.
Cleaning is also a good time to check the geometry that gets missed during routine janitorial work. Look at the underside of returns, the inside face of switchback turns, and the rail near the first and last nosings. Those are the spots where rust bleed, coating failure, and impact damage show up first.
What to tighten, repair, and replace
Annual hardware service makes sense on coastal stairs, especially exposed exterior runs. Check bracket fasteners, post-base anchors, splice connections, and any concealed attachment that can loosen with heat, moisture, and repeated loading.
Some repairs are straightforward. If the rail profile still complies and the problem is isolated to a loose bracket or anchor, re-secure the connection and confirm the rail height and clearance did not shift during the repair. If corrosion has swollen the connection, deformed the grip surface, or roughened the return, replacement is usually the cleaner fix.
Field judgment matters. A patched section may look acceptable after paint, but if the hand catches at the splice, the return no longer closes properly, or the extension length changed during the repair, the installation is still wrong. On ADA stair work, appearance is secondary to continuity, clearance, and a stable grip path.
Keep a written log of inspections and repairs. For property managers, that record helps when an owner, insurer, or AHJ asks how the accessible route has been maintained over time.
Planning a Code-Compliant ADA Handrail Stairs Project
Most ADA stair handrail failures are set in motion before the rail ever hits the shop floor. The problem is rarely welding or paint. It is bad field geometry, vague scope, and handrail layout that was never tied tightly enough to the stair nosings, landing edges, and return conditions an inspector will check on site.
On Florida work, that planning gap shows up fast. Existing concrete runs out of square. Stucco thickness changes bracket stand-off. Switchback stairs look simple on plan, then create continuity problems at the intermediate landing once real dimensions are pulled in the field. If the rail path, extensions, and returns are not resolved before fabrication, the installer ends up forcing parts to fit and hoping the final grip path still passes.
The planning sequence that prevents rework
Use a field-first sequence.
- Confirm where accessibility applies. Mixed-use and multifamily projects get misread all the time, especially when a stair serves both private and common areas.
- Measure the built stair, not the old drawings. Pull rise, run, width, landing depth, wall offsets, finish thickness, and any variation in the nosing line.
- Set the nosing reference line first. Rail height is checked from that line, and extension layout falls apart if the nosing reference is off.
- Draw the top and bottom extensions before releasing fabrication. Do not leave termination length, return direction, or landing projection to field judgment.
- Resolve switchbacks and inside turns as a continuous grip path. A stair can look fine from ten feet away and still fail because the user has to break contact at the landing turn.
- Choose the rail profile and hardware after the geometry works. A compliant profile still has to clear the wall, fit the bracket, and survive the exposure level.
For owners comparing proposals, this guide to ADA handrail installation planning helps separate a real layout scope from a basic fabrication quote. AlliedFenceAndGate.com™ handles ADA-compliant railing fabrication, permitting, and inspection coordination as part of its Florida project work.
Sample Scope of Work for ADA Handrail Stairs
| Line Item | Specification | Reference |
|---|---|---|
| Demolition | Remove existing noncompliant rail and patch affected mounting points | Existing field conditions |
| Layout | Establish nosing line, rail height band, extension geometry, and return conditions before fabrication | Approved field measurements |
| Handrail profile | Use graspable circular or compliant non-circular profile | ADA dimensional requirements |
| Mounting hardware | Match bracket and anchor type to concrete, masonry, or framed substrate | Substrate-specific fastening plan |
| Finish | Specify exterior-rated finish suitable for exposure conditions | Project environment |
| Continuity details | Resolve landings, switchbacks, and inside corners in shop drawings | Stair configuration |
| Documentation | Provide shop drawings, product data, and as-built installation photos | Permit and inspection file |
| Responsibility matrix | Identify who pulls permit, schedules inspection, and signs off field dimensions | Contract scope |
What inspectors want to see before closeout
Inspectors want dimensions they can verify without guessing. The cleanest submittal package shows the rail height measured from the nosing line, the top and bottom extension lengths, the return type, bracket locations, and the clearance between the wall and the gripping surface. On switchback stairs, include the landing turn condition clearly. That is one of the first places field modifications create a break in continuity.
As-built photos should do more than prove the rail was installed. They should show the relationship between the first and last risers, the extension start and stop points, and the return back to wall, guard, or post. If those details are documented early, closeout goes smoother and punch-list corrections stay smaller.
#MartinCounty #PalmBeachCounty #TreasureCoast #JupiterFL #StuartFL #PalmCityFL #JensenBeachFL #HobeSoundFL #TequestaFL #WestPalmBeachFL #PalmBeachGardensFL #JupiterFencing #StuartFencing #PalmBeachGardensFencing #FloridaHandrails #ADAhandrails #StairHandrails #CommercialRailings #FloridaContractor #AccessibleDesign
AlliedFenceAndGate.com™ fabricates and installs ADA-compliant stair handrails, ramps, and related railing systems for commercial and residential-access projects across Florida's Treasure Coast and northern Palm Beach County. Property owners, managers, and contractors who need help with layout, permitting, fabrication, or inspection coordination can review service details at AlliedFenceAndGate.com™.
Related Fencing Services
Need a fence or gate on the Treasure Coast?
Licensed, insured, and bonded. Free estimates across Martin, St. Lucie, Indian River & Palm Beach counties.
Call (772) 530-3127