ADA Handrail Extension Requirements for Ramps and Stairs
A railing quote sits on a desk, a permit drawing is open on a screen, and one dimension keeps causing doubt. The rail itself looks right, but the ends stop exactly where the stair or ramp stops. That's where an ADA handrail extension matters, and it's also where many otherwise tidy installations fail inspection.
The rule isn't about adding the longest possible tail. A compliant extension matches the run type, the end position, the tread depth where that applies, and the space around doors and landings.
Table of Contents
- What an ADA Handrail Extension Is and the Minimum Lengths
- Florida Code Rules That Can Differ From the Federal Standard
- How to Measure Extensions on a Stair or Ramp
- Worked Examples for Ramps and Stairs
- When Doors and Tight Landings Change the Extension
- Inspection Failures and How to Fix Them
- Confirm the Extension Plan Before You Order Railings
What an ADA Handrail Extension Is and the Minimum Lengths
An ADA handrail extension is the horizontal length a handrail continues past a ramp run or stair flight before it returns to a wall, guard, landing surface, or the handrail of an adjacent run. It lets a hand find the rail before the slope starts and keeps hold after the slope ends, while the return stops an exposed end from snagging a sleeve, bag, or mobility aid.
These rules apply at public-facing commercial sites, government buildings, healthcare and hospitality properties, and HOA clubhouses, with Florida enforcing accessible design through the Florida Building Code. A private single-family interior stair is a different situation. An Amenity center stair, a medical office ramp, or a restaurant entry ramp is not.
Height Comes First
Handrail height on ramps and stairs is 34 to 38 inches, measured from the walking surface or stair nosing to the top of the gripping surface. The extension isn't a separate, lower tail. It stays at that same gripping height along its full length, so a person doesn't have to drop or raise a hand at the exact moment balance changes.
That height point matters during layout. A bracket line that works on the slope can still drift out of range on a flat landing if the installer follows the guard top instead of the gripping surface. The dimension applies to the handrail, not to a decorative cap or a higher guardrail.
The federal baseline comes from Section 505.10 in the 2010 ADA Standards, which separates ramp extensions from stair-top and stair-bottom extensions. Reading the right row matters more than memorizing one number.
Minimum Handrail Extensions by Ramp and Stair Position
| Case | Minimum extension | Measured from | Ends at |
|---|---|---|---|
| Ramp, top | 12 in (305 mm) horizontal | End of ramp run | Wall, guard, landing or adjacent ramp handrail |
| Ramp, bottom | 12 in (305 mm) horizontal | End of ramp run | Wall, guard, landing or adjacent ramp handrail |
| Stair, top | 12 in (305 mm) horizontal | First riser nosing | Wall, guard, landing or adjacent flight handrail |
| Stair, bottom | At least one tread depth, following the stair slope | Last riser nosing | Wall, guard, landing or adjacent flight handrail |
| Florida non-continuous ramp, top and bottom | 18 in (457 mm) horizontal, parallel to floor | End of sloped segment | Return point confirmed with the building department |
| Florida non-continuous stair, top | 12 in horizontal | Top riser | Return point confirmed with the building department |
| Florida non-continuous stair, bottom | 12 in plus one tread width | Last riser nosing | Return point confirmed with the building department |
Read the table in order. First, find the run type, ramp or stair. Next, find the position, top or bottom. Then check the Florida rows only when the project is governed by the Florida edition and the rail is non-continuous.
The row that catches people is the stair bottom. It isn't a fixed number that can be copied from the top of the flight. Its minimum grows with tread depth, so two stairs in the same building can need different bottom extensions if their treads differ.
Practical rule: Every value in the table is a minimum, not a target to trim during fabrication.
Space planning follows from that point. A compliant design often needs more landing or wall space than the ramp or stair run alone suggests. If an architect draws a landing that ends right at the slope, the railing shop inherits a problem that can't be solved with neater welds.
The test is straightforward. If a rail stops short of its minimum, lacks a return, or ends as an open projection, the design fails regardless of how clean it looks. Finish, color, and bracket style don't cure a short extension.
Florida Code Rules That Can Differ From the Federal Standard
The controlling question is which code edition governs the permit. The Florida Building Code adopts ADA standards for accessible design, so state inspectors enforce federal requirements, but Florida provisions add specific values for non-continuous handrails. A designer who copies only the federal row can still miss the local requirement.
Florida's difference is clear in the Florida Building Code draft material on the ADA Standards, which states that a non-continuous ramp handrail must extend at least 18 inches (457 mm) beyond the sloped segment at both the top and bottom, parallel to the floor or ground. The same provisions require a non-continuous stair handrail to extend at least 12 inches beyond the top riser and at least 12 inches plus one tread width beyond the bottom riser, with the bottom portion continuing along the stair slope for one tread width before the remaining extension becomes horizontal.
Continuous Versus Non-Continuous
The drawing test is simple:
- Continuous rail: The gripping surface runs uninterrupted along the full run and carries into the next run or turn without a break at the end of the slope.
- Non-continuous rail: The rail stops at the top and bottom of the sloped segment as a separate piece for that run.
That distinction decides which row applies. A continuous rail follows the standard 2010 approach. A non-continuous Florida rail needs a check against the Florida rows in the table, especially on ramps where the state number is longer.
Timing also matters. The edition in force for the permit application governs the job, not the edition a contractor used on a project last year. An older installation built under an earlier bottom-extension rule isn't automatically defective if it meets or exceeds the current requirement, but new work and alterations can't rely on habit.
Confirm Before Fabrication
Three steps prevent most disputes:
- Write the code edition on the drawing. The extension note should name the edition beside each dimension.
- Ask the building department which edition applies. A short plan-review question costs less than refabricating a rail.
- Record the answer with the permit file. The installer, fabricator, and inspector then work from the same note.
For any Florida row, the return point should also be confirmed before ordering. It's unsafe to assume the federal return rule applies unchanged to a Florida non-continuous row without confirmation from the authority having jurisdiction.
A Florida project should never assume the federal figure is the local figure. Checking the adopted edition first is part of the design, not paperwork after the design.
How to Measure Extensions on a Stair or Ramp
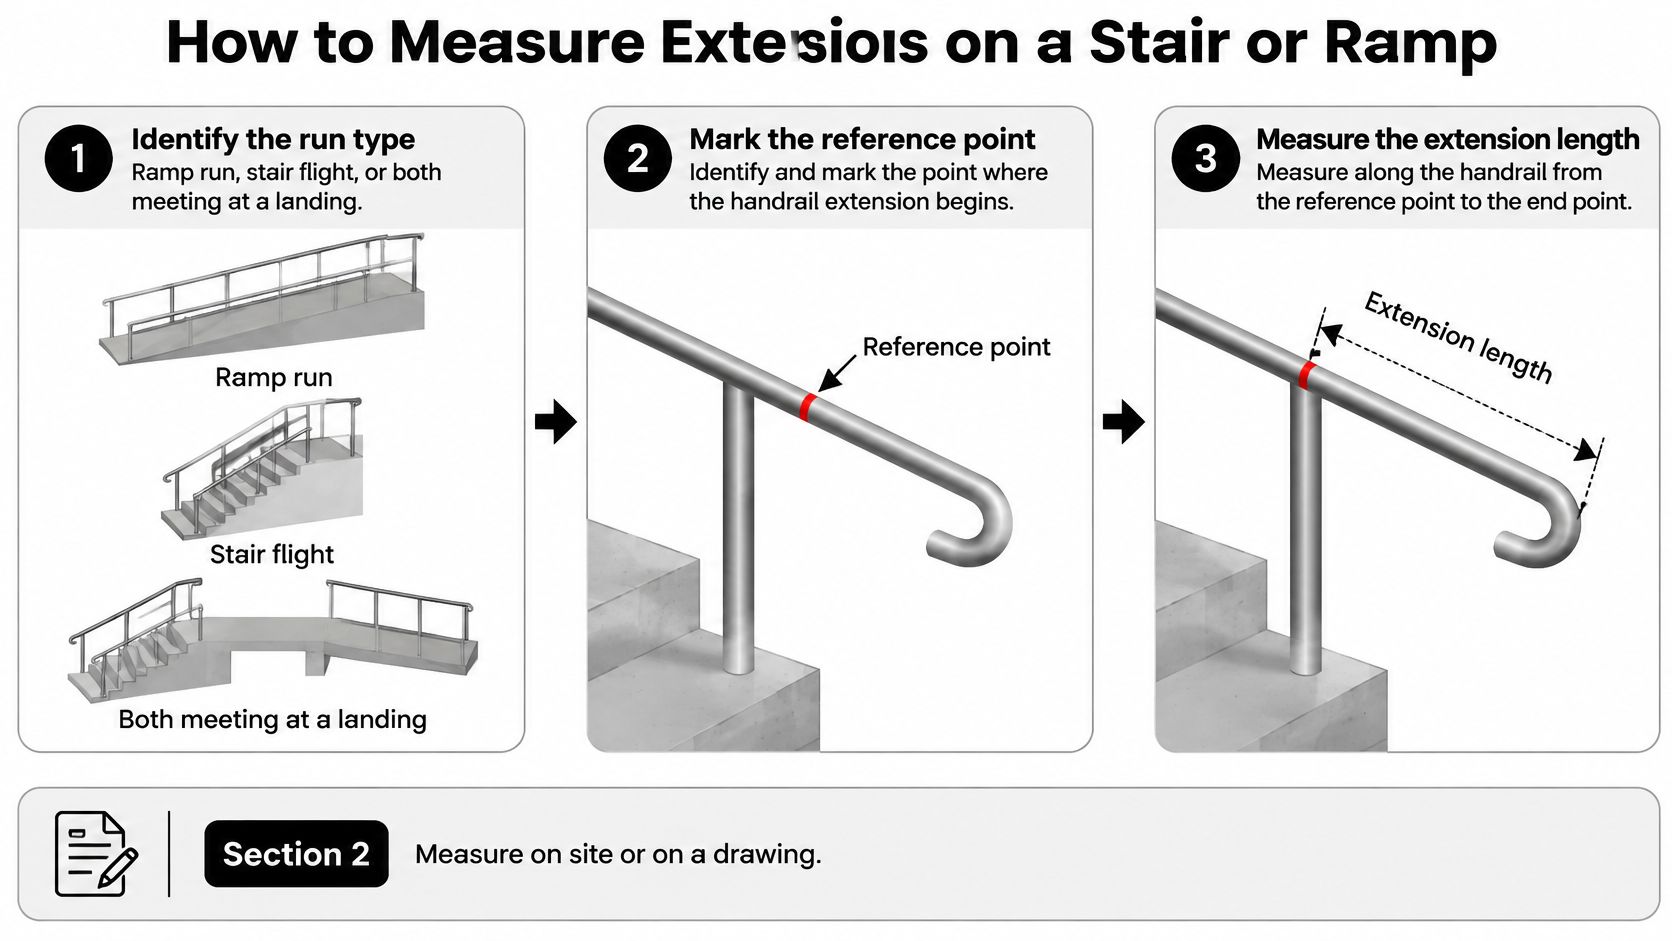
Most measuring errors happen before a tape is pulled. The installer picks the wrong starting point, measures a curve instead of the gripping length, or treats every end as a 12-inch tail. Careful marking prevents all three.
The Access Board stair guide clarifies that for stairs, the top extension must run horizontally 12 inches beyond the first riser nosing, the bottom extension must continue at least one tread depth beyond the last riser nosing, and for ramps, both extensions must run horizontally at least 12 inches beyond the ramp run. The same guidance states the required length is measured to the beginning of the return radius, not to the outside end of a curved return.
Seven Field Steps
- Identify the run type. Mark whether the run is a ramp, a stair flight, or both meeting at a landing. The common slip is measuring a combined entry as one element when each run has its own end condition.
- Mark each reference point. Use the end of the ramp run, the first riser nosing at a stair top, and the last riser nosing at a stair bottom. Measuring from the existing rail end gives a length, but not the code length.
- Measure ramps and stair tops horizontally. Lay the dimension flat along the landing from the reference point. A sloped tape reading can look generous while the horizontal distance falls short.
- Measure a stair bottom along the slope. Extend the handrail along the stair slope for one tread depth beyond the last riser nosing, then return it to a wall, guard, landing, or adjacent rail. A further horizontal tail shouldn't be added unless the adopted code text requires it, and the wording should be confirmed against the edition in force before it goes on the drawing.
- Plan the return. Choose a wall, guard, landing surface, or adjacent-run handrail, and measure the required length to the start of any return radius. Measuring to the outer curve steals usable gripping length and creates a false pass in the shop.
- Check doors and circulation. Compare the extension with door swings, door maneuvering clearance, and protruding-object limits, and mark any conflict on the drawing. Designers reviewing an accessible route can pair this check with the guidance on wheelchair ramp requirements before the landing layout is fixed.
- Confirm height along the extension. The gripping surface stays at 34 to 38 inches from the walking surface or nosing line. A long extension mounted too low or too high still fails.
Simply adding a 12-inch tail to every handrail can be wrong. Bottom stair extensions follow tread depth, not a universal 12-inch rule.
A tape measure, a level, painter's tape, and a marker handle most field checks. Tape marks let an owner see where a return lands before holes are drilled. They also reveal conflicts with door hardware, wall protection, and guard posts while changes are still cheap.
The result should be a marked drawing or field sketch that an installer and a building official can both read without a question. Each end needs a reference point, a horizontal or sloped dimension as applicable, a return detail, and the rail height. Vague notes such as "extend rail per code" invite different interpretations in the shop and on site.
Worked Examples for Ramps and Stairs
Numbers become clearer when each case names its reference point, measured length, return, and result. The examples here use simple dimensions so each pass or fail can be checked against the table.
Ramp Beside a Glass Door
Say a ramp run ends at a 60-inch landing beside a glass door. At the top, the reference point is the end of the ramp run. The rail extends 12 inches horizontally over the landing, returns to the side wall, and leaves the door approach clear.
That rail passes on length and return. At the bottom landing, the same method applies from the lower end of the ramp run. A 12-inch horizontal extension returns to a guard, so the bottom also passes. If either rail stopped flush with the sloped segment, it would fail even though the ramp itself was built correctly.
Stair With 11-Inch Treads
At the top of a stair with 11-inch treads, the reference point is the first riser nosing. The rail extends 12 inches horizontally beyond that nosing and returns to the wall. That's a pass.
At the bottom, the reference point changes to the last riser nosing. The rail continues along the stair slope for 11 inches beyond that point before it returns. The bottom extension is therefore 11 inches, not 12, and it passes because it matches one tread depth. A person stepping off the last tread still has the rail in hand while weight shifts onto the landing.
Stair With 13-Inch Treads
The same layout with 13-inch treads produces a different answer. The top still needs its horizontal extension from the first riser nosing. The bottom now needs 13 inches along the slope beyond the last riser nosing.
A copied 12-inch tail falls short at that bottom end. The failure isn't visible from across a lobby, which is why the tread depth belongs on the railing drawing. A shop that fabricates both stairs from one standard detail creates one pass and one fail.
Florida Non-Continuous Stair
For a Florida non-continuous stair with 11-inch treads, the bottom row calls for 12 inches plus one tread width. The arithmetic is 12 + 11 = 23 inches. The reference point is the last riser nosing, and the building department should confirm how that length is measured before the detail is drawn.
That Florida case shows why copying a federal example into a local permit set is risky. The run looks identical to the earlier stair, but the governing row changes the required length.
When Doors and Tight Landings Change the Extension
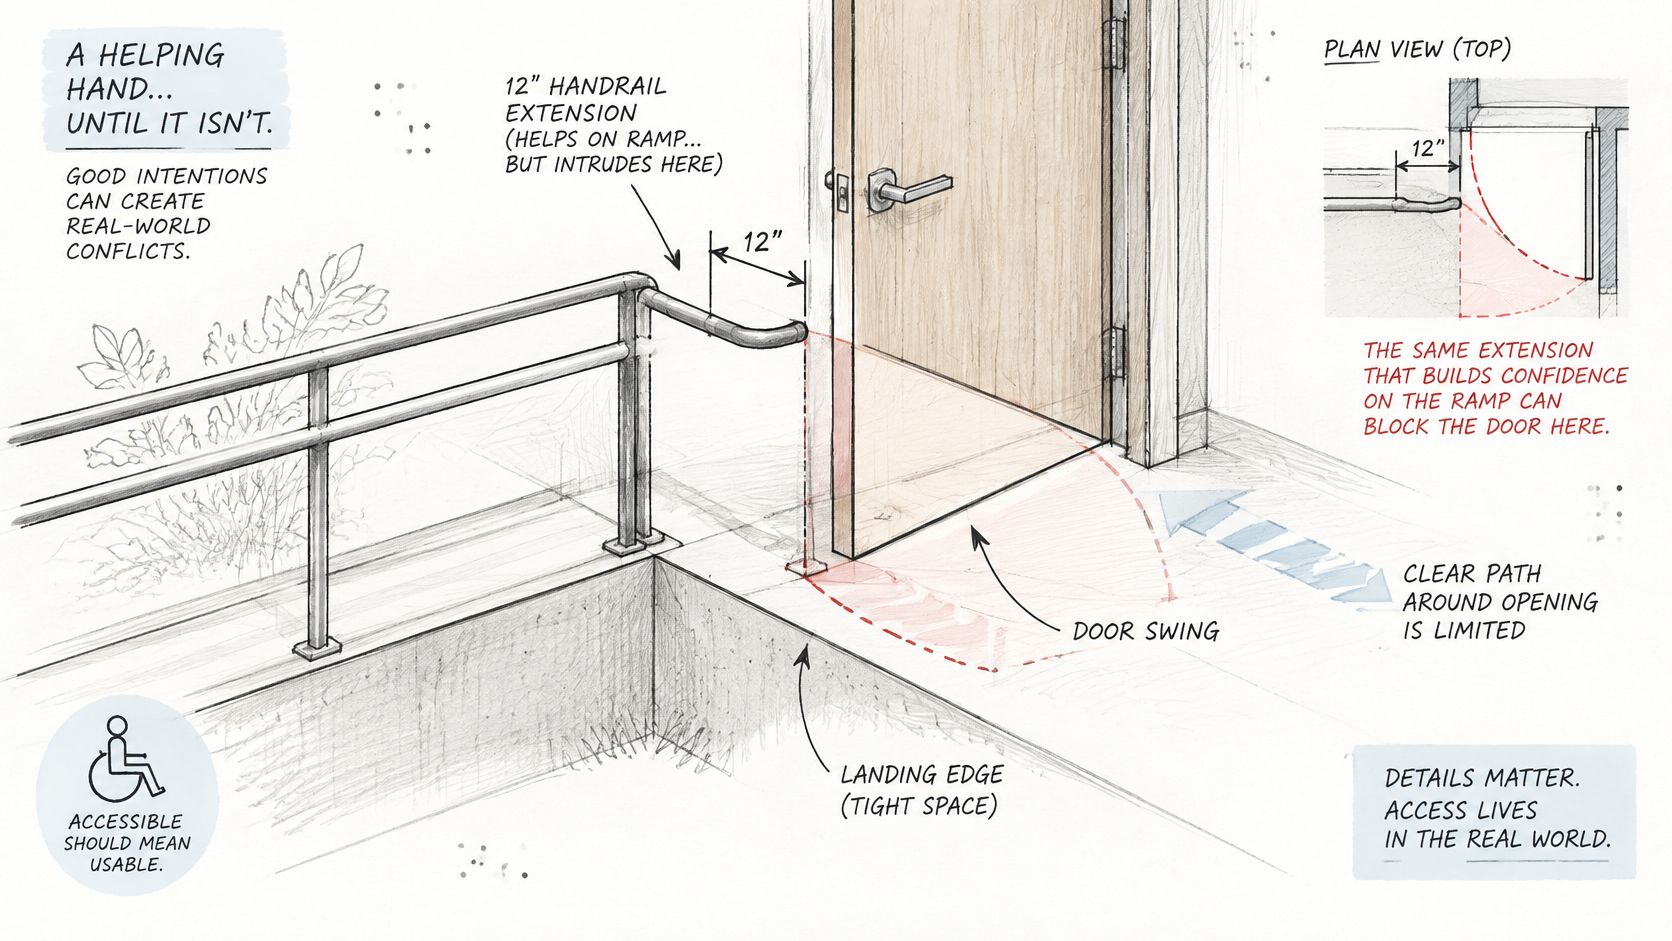
Longer isn't always more compliant. A 12-inch tail at the top of a ramp can project into a door swing or block the maneuvering clearance a person needs to open that door. The extension then solves one access problem by creating another.
That conflict is common in older commercial buildings. A ramp gets added inside an entry vestibule, a stair lands beside an office door, or a corridor turn leaves little wall for a return. The correct response isn't to force the standard detail into a space that can't hold it.
Exceptions That Matter
The Access Board guide to stairways notes that continuous handrails do not need extensions at the inside turn of switchback or dogleg stairs and ramps, and that in alterations, an extension may turn, wrap, or be shortened when a full extension would project hazardously into a circulation path. It also makes clear that handrails cannot overlap required door maneuvering clearances.
Those exceptions don't erase the need for design. A shortened or redirected extension still needs a deliberate end condition, a graspable path, and coordination with the building official. Cutting a rail short because a landing feels tight is not the same as using an alteration exception.
A Decision Sequence for Tight Conditions
- Document the existing condition: Record landing dimensions, door swings, wall locations, and photos before proposing a change.
- Identify the conflict: Mark where a full extension enters a doorway, circulation route, or maneuvering clearance.
- Protect graspability: Confirm a hand can stay on the rail through the turn, wrap, or shortened return.
- Sketch the alternative: Show the reference point, available length, return, and any protrusion into the path.
- Coordinate before fabrication: Review the sketch with the applicable building official and keep the response with the permit records.
Say a 36-inch landing sits beside a door approach. A straight return pushes the rail into the space a wheelchair user needs to pull the door open. The designer instead wraps the return down the side wall, keeps the grip continuous, and keeps the door approach clear. The exact solution still needs approval for that alteration, but the logic is sound because it serves movement through the whole entry.
Compliance means the rail serves the user without creating a new hazard, not that the extension number is maximized.
Switchbacks need the same whole-route thinking. At an inside turn, a continuous rail already carries the hand into the next run, so adding a separate tail can crowd the landing. The compliant extension is the one matched to its position and surroundings.
Inspection Failures and How to Fix Them
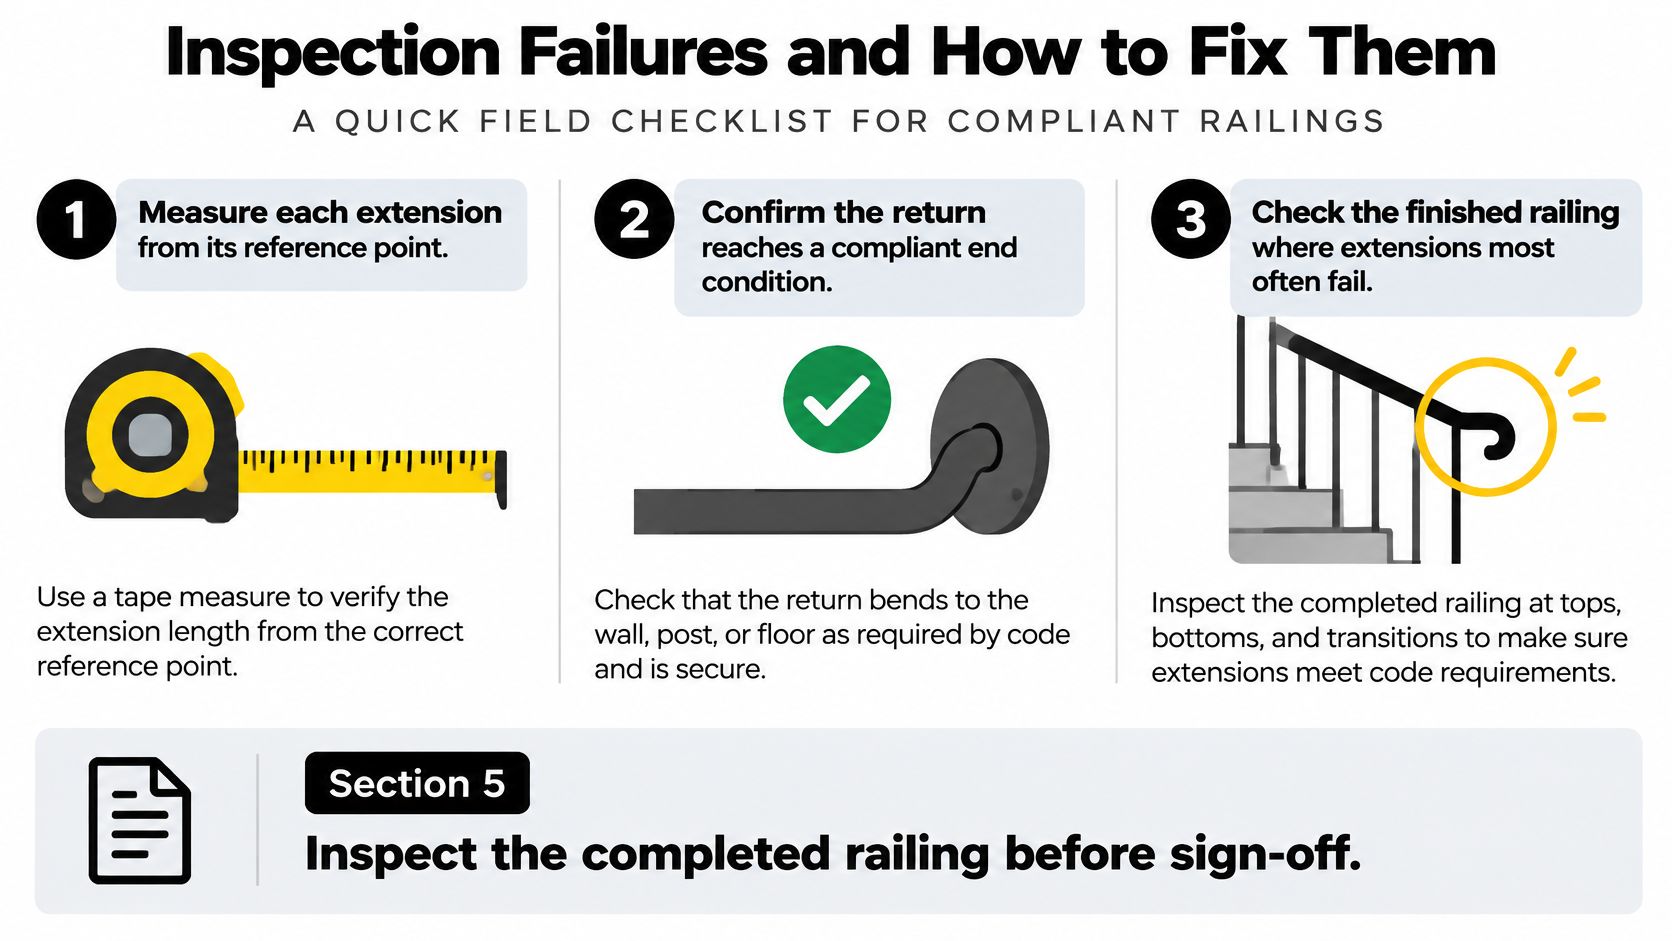
Inspectors test the finished rail at its ends first. A long, straight middle section rarely causes the argument. The tape goes to the nosing, the landing edge, the return, and the bracket height.
Three field checks cover most of that inspection:
- Measure from the reference point: Each extension starts at the ramp-run end or the correct riser nosing, not at the nearest post.
- Confirm the return: The rail reaches a wall, guard, landing surface, or continuous adjacent rail without an open end.
- Check height and grip: The gripping surface stays 34 to 38 inches high and remains graspable through the extension and return.
Extension Failures Found on Inspection
| Symptom | Likely cause | Fix |
|---|---|---|
| Rail ends flush with the ramp edge | Extension omitted | Add a horizontal extension that returns to a wall, guard or landing |
| Stair bottom extends only 12 in on a deep tread | Universal 12-inch rule applied | Extend one tread depth along the slope before going horizontal |
| Rail end sits inside a door swing | Extension enters maneuvering clearance | Turn, wrap or shorten the return where the alteration exception allows, with building official approval |
| Return length measured to the outer curve | Measured from the wrong point | Re-measure to the start of the return radius |
| Rail stops short of an adjacent ramp run | Rails not made continuous | Connect the rail to the adjacent run's handrail |
| Rail height outside 34 to 38 in | Bracket set at the wrong height | Re-set brackets to the required height |
Some fixes are same-day work. Re-setting a bracket, adding a wall return, or correcting a measurement mark may not disturb the rest of the run. Those repairs still need solid anchoring into framing, masonry, or other sound substrate, not trim or thin sheathing.
Other failures require redesign. Rerouting a rail around a door swing, extending a deep-tread stair bottom, or connecting two runs can change post locations and guard details. Property teams planning that scope can review the broader ADA handrail installation process before ordering replacement sections.
Paperwork matters during the correction. A marked drawing, the code edition used, field photos with a tape visible, and any approval for an alteration exception show why each end was built that way. Without those records, a later inspector sees only a shortened rail and has no basis to accept it.
Pre-Inspection Checklist
- Pull each dimension from its nosing or ramp-run end. Photograph the tape at each end.
- Run a hand along the full gripping surface. Snags, breaks, and rotating sections show up quickly.
- Open every nearby door through its full swing. A closed-door check misses the conflict.
- Confirm every end condition. No rail should terminate as an open projection.
- File the code edition and approvals. Paper records should match the built detail.
A rail that looks neat but stops short of its minimum will still fail. Paint and polish don't change the tape reading.
Confirm the Extension Plan Before You Order Railings
A short review before fabrication prevents the most expensive corrections. The checklist can be finished with a drawing, a tape, and one call to the building department.
- Identify each run: Label every ramp and stair, then mark its top and bottom positions.
- Pick the matching table row: Note whether a Florida non-continuous row applies and record the edition governing the permit.
- Measure from the correct reference point: Mark door, landing, and circulation conflicts directly on the plan.
- Ask about constrained ends: Confirm whether an alteration exception applies before a rail is shortened or wrapped.
- Require a complete drawing: Each extension length, return detail, rail height, and code edition should be called out by name.
Material selection doesn't fix a wrong dimension, but durable construction helps a compliant detail stay compliant. Commercial teams comparing frame options can review commercial aluminum railing systems while keeping the extension dimensions separate from the finish decision.
AlliedFenceAndGate.com is a licensed ADA compliant contractor, and its ADA and commercial installations are Florida Building Code compliant and inspection-ready. A review of the marked drawing through AlliedFenceAndGate.com before fabrication gives an owner or contractor a chance to catch a short bottom extension, a missing return, or a door conflict while the fix is still a line on paper.
#ADAHandrailExtension #ADACompliance #FloridaBuildingCode #TreasureCoast #MartinCounty #PalmBeachCounty #StairHandrails #RampHandrails #WheelchairRamps #HandrailInstallation #FloridaContractor #AccessibleDesign #ADARailings
AlliedFenceAndGate.com™ fabricates ADA-compliant ramp railings and stairway handrails and can review a marked extension plan before materials are ordered. Owners, HOA boards, and contractors across Florida's Treasure Coast can request that plan review and discuss inspection-ready railing work at AlliedFenceAndGate.com™.
Related Fencing Services
Need a fence or gate on the Treasure Coast?
Licensed, insured, and bonded. Free estimates across Martin, St. Lucie, Indian River & Palm Beach counties.
Call (772) 530-3127